

Chinese Maple (Acer buergerianum)
Birds Nest Ferns will add the sense of a tropical rainforest to your living spaces
Bird’s Nest Fern - Asplenium nidus
 Image by hartonosubagio from PixabayCondensed Version:
There are various types of birds nest ferns, and in their natural environment they thrive in warm, moist, humid forests where they grow under the forest canopy where they are sheltered from the harsh sun, so if you are growing these ferns at home, be it indoors or outdoors, the best results are achieved if you can try to mimic the tropical conditions they love.
Naturally they will flourish in our subtropical regions, but in cold and frosty regions of the country they are prized indoor plants. Bird’s nest ferns thrive in temperatures between 15 and 27°C, and can tolerate temperatures down to 10°C, but anything colder than that can harm the plant. They love humidity and must be placed in shady areas of the garden where they will receive medium to bright indirect light. Indoors they will grow well in medium and even lower light conditions.
If you are growing in pots, a mix of orchid bark, coarse perlite, and peat moss is recommended, but because peat moss is no longer considered to be sustainable, you can substitute it with palm peat. Some gardeners recommend using a high quality potting soil, amended with perlite. No matter what growing medium you use, just ensure that it’s loose, light, and rich in organic matter that will hold moisture, but which also has excellent drainage. Mounting this fern onto a piece of driftwood or bark allows for excellent drainage and air circulation around the roots.
Water is like lifeblood to these ferns, and they need a fair amount of it, but be careful not to overwater your plants as they don’t do well in soggy soil. In autumn as temperatures decrease, gradually start to water less, and during winter you may only need to water every couple of weeks.
During the summer growing season you can feed monthly with a specialised fern food, or any liquid fertiliser for leafy plants
Full Version:
Description, history and interesting facts about birds nest ferns:
Asplenium nidus is native to east tropical Africa, in Tanzania and including the Zanzibar Archipelago; and to temperate and tropical Asia, in Indonesia, East Timor, the island of Kyushu, and the Ryukyu Islands of Japan, Malaysia, the Philippines, Taiwan and Thailand. It is also found in northern Australia and the Pacific Islands.
It belongs to the Spleenwort family of ferns, and as the name implies, historically it was believed that these plants had medicinal value for the spleen. Its common name arises from the way the fronds roll back and turn brown as they die causing a 'birds nest' to develop in the crown of the plant.
In their natural habitat in tropical rainforests birds nest ferns grow underneath the forest canopy where they are protected from the harsh sun. They are able to attach themselves onto the branches or trunks of trees, fallen trunks, and other mossy surfaces via their shallow rhizomes. A rhizome is a modified subterranean plant stem that sends out roots and shoots from its nodes. Rhizomes are also called “creeping rootstalks” or just “rootstalks”.
These types of plants are called “epiphytes” and they co-exist with their hosts in the most harmonious, harmless way, deriving their nutrients from the air, water, dust, and debris around them. Many, like the birds nest fern can also survive as a terrestrial plant growing on the rich organic matter of the forest floor.
Unlike many other ferns which grow feathery leaflets, bird's nest ferns have smooth, bright green lance-shaped fronds that grow from a central rosette, and sometimes develop gentle ripples when grown with sufficient light. Birds nest ferns have a slow growth rate, and they typically grow more slowly and remain smaller when kept indoors versus outdoors. In the tropics the fronds can grow anything from 50 to 150 centimetres long and 10 to 20 centimetres broad. In cooler climates they will not reach such large proportions.
Spores develop on the underside of the fronds, forming long rows extending out from the midrib to the outer part of the frond. The fronds roll back as they turn brown, creating a massive nest of dry leaves in the branches and trunks of trees.
Types of Birds Nest Fern:
Asplenium nidus ‘Antiquum’
‘Antiquum’ has long, bright green arching leaves with pointed ends. Mature fronds have a decorative wavy edge, and develop a strong, distinctive brown midrib in the centre of the nest. Mature specimens can reach 90cm tall and spread 1.2m wide.
Click here to see Google images of Asplenium nidus 'Antiquum'
Asplenium nidus 'Osaka'
The ‘Osaka’ cultivar is a compact variety of the species, and has long, glossy leaves with rippled margins, giving the whole plant a rather luxuriant look. At maturity it can reach a height and spread of 1m or more.
Click here to see Google images of Asplenium nidus 'Osaka'
Asplenium nidus 'Crissie'
'Crissie' is a smaller version of bird's nest fern, and once mature it can reach about 80cm tall and wide. It is a real stunner with its unique frilly, emerald green foliage. The wild type of this birds nest fern is native to tropical Africa, Australia and Polynesia
Click here to see Google images of Asplenium nidus 'Crissie'
Asplenium nidus 'Crispy Wave'
'Crispy Wave' represents a captivating new cultivar with lush, deeply pleated, bright green leaves. It matures to about 60cm tall and 45cm wide.
Click here to see Google images of Asplenium nidus 'Crispy Wave'
Medicinal uses of birds nest ferns:
Asplenium nidus has been used locally in folk medicine for asthma, sores, weakness, and halitosis (bad breath).
How to cook with birds nest ferns:
The sprouts of Asplenium nidus are eaten in the Polynesian islands, where it is often cooked with coconut cream. In Taiwan where they are known as 山蘇, pronounced shansu, meaning "mountain vegetable", they are eaten as a garnish for Ohitashi (Spinach Salad) and Miso Soup, and may also be stir-fried or boiled. The larger fronds are also used for wrapping food in to steam. This traditional vegetable has gained such popularity that today it even appears on the menus of chain restaurants.
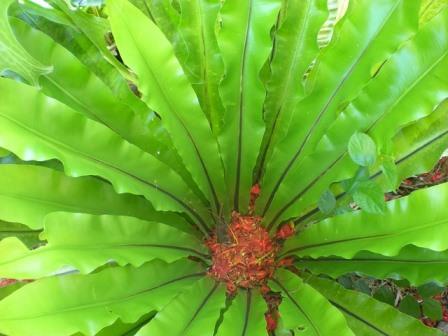 Image by Brian Clark from PixabayHow to use birds nest ferns in the garden & home:
Bird’s nest ferns are attractive, whimsical and enchanting, and Asplenium nidus has gained the Royal Horticultural Society's Award of Garden Merit.
In the warm subtropical regions of South Africa this fern is fantastic to use in the garden, and in tropical regions it often lives in palm trees, where it collects water and humus in its leaf-rosette.
Bird’s nest ferns make great bathroom plants, because they need high humidity levels and will take medium to lower light conditions indoors. However, they don’t like it too cold, so ensure that the temperature indoors never drops below 10°C. They are also perfectly happy if placed on a table top or shelf in any living area or office, if provision is taken for a little extra humidity.
Because bird’s nest ferns are epiphytic plants they are wonderful to mount on an attractive piece of driftwood, bark, or cork. This method allows for good air circulation around the roots and will certainly add an interesting visual element to your plant displays. These ferns also work well in large terrariums.
An added bonus is that the birds nest fern is highly efficient at converting Carbon dioxide (CO2) into oxygen, and cleaning the air.
Indoor & outdoor cultivation of birds nest ferns:
In their natural environment birds nest ferns thrive in warm, moist, humid forests where they grow under the forest canopy where they are sheltered from the harsh sun, so if you are growing these ferns at home, be it indoors or outdoors, the best results are achieved if you can try to mimic the tropical conditions they love.
Naturally they will flourish in our subtropical regions, but in cold and frosty regions of the country they are prized indoor plants. Bird’s nest ferns thrive in temperatures between 15 and 27°C, and can tolerate temperatures down to 10°C, but anything colder than that can harm the plant.
Do not use leaf shine products on your bird’s nest ferns, as they’re very sensitive to chemicals. If your plant is looking a little dusty, wash it off with tepid water.
How much light do birds nest ferns need?
Because the fronds of these ferns can burn in harsh sunlight, they must be placed in shady areas of the garden where they will receive medium to bright indirect light. Indoors they will grow well in medium and even lower light conditions.
How much humidity do birds nest ferns need?
Indoors they prefer high humidity and enjoy moist environments such as a bathroom, greenhouse, or terrarium.
How to create a humid environment for birds nest ferns?
In dry regions you can run a humidifier near the plant, and placing potted plants in a drip tray filled with pebbles and water will also create some extra humidity around the foliage, without having the pot stand in a saucer full of water, which could cause root rot. Regularly misting the fronds with water also helps, and if you can use rain water do so, as ferns have sensitive leaves.
Grouping your plants together will also help, as the transpiration of groupings of plants will collectively increase the humidity levels around them, creating a little microclimate. Utilising a decorative bowl filled with water as part of your plant display will further enhance the humidity as well as the charm of your display.
Protect your indoor plants from cold draughts, air conditioning or heating vent drafts which can dry the air out.
What is the best growing medium for birds nest ferns?
If you are growing birds nest ferns in pots the growing medium you use is vital to the health of your plants. Generally, a mix of orchid bark, coarse perlite, and peat moss is recommended, but because peat moss is no longer considered to be sustainable, you can substitute it with palm peat. Some gardeners recommend using a high quality potting soil, amended with perlite. No matter what growing medium you use, just ensure that it’s loose, light, and rich in organic matter that will hold moisture, but which also has excellent drainage. Mounting this fern onto a piece of driftwood or bark allows for excellent drainage and air circulation around the roots.
How much water do birds nest ferns need?
Water is like lifeblood to these ferns, and they need a fair amount of it, but be careful not to overwater your plants as they don’t do well in soggy soil. Try to water so the growing medium is evenly moist, or whenever the top 2.5cm of soil is dry.
In nature water and debris collects in the crowns of these ferns, but when growing them at home, its best to avoid watering directly into the centre of the plant, as too much water in the crown can encourage mould and rot in the dense nest.
To get them to grow luxuriantly with healthy, shiny leaves, spray the plants regularly with a fine mist spray of water, or rainwater. To keep their roots moist, mounted specimens will need frequent misting, and an occasional a good soaking in a basin of water.
In autumn as temperatures decrease, gradually start to water less, and during winter you may only need to water every couple of weeks. However, if they’re in a room which gets very warm because of heaters etc. be fastidious about checking the soil as it will dry out quicker.
How to fertilise birds nest ferns?
During the summer growing season you can feed monthly with a specialised fern food, or any liquid fertiliser for leafy plants. Direct contact with some liquid fertilisers can burn the leaves of ferns, so if you are not using a specialised fern food, dilute it to half the recommended strength. Test a frond beforehand to check for sensitivity, or apply the fertiliser to the soil or growing medium only, and not to the fronds. Stop feeding in autumn and through winter.
How to repot birds nest ferns?
Birds nest ferns do not have a large root system, so you won’t need to repot very often. They will only really need a larger pot once they’ve grown so large that they’re unstable in their small container. This is typically only necessary every two to three years, and spring or early summer is the best time to repot. Avoid repotting during the winter months when the plant is dormant, as it may struggle to recover from the disturbance.
Select a container that's large enough to keep your plant stable, but do not be tempted to plant it into one that is too large – 3 to 5cm bigger is sufficient. Make sure that the pot has ample drainage holes, and often a ceramic pot is better than plastic to anchor the plant, and allows the roots to breath.
Carefully loosen your plant from its pot and set it in the new pot at the same depth as before, then fill around the root ball with fresh potting mix. Do not touch the roots unless the plant is very root bound, and you want to tease a few roots loose at the bottom before planting.
How to mount a birds nest fern?
Birds nest ferns are quite easy to mount onto a wooden board, cork or bark, but make sure you use a hard wood or bark that won’t decompose quickly, and you will also need to drill a hole into the mount to fit a small hanging bracket.
For mounting you can use sphagnum moss which is available from some garden centres for use in terrariums, as well as from bonsai growers and even some pet stores. Online you can order sheets of living moss which are perfect to use. To tie your fern onto the mount you can use garden or fishing twine.
Take your fern out of its pot and loosen up the bottom of the root ball gently with your fingers. If the roots are too dense, you can trim away some from the bottom.
Wrap the root ball with moistened moss to completely cover the roots and then use twine to secure the moss before mounting and tying the fern on the mount. Mist spray to ensure the root ball is completely moist, hang and enjoy!
Make sure that the moss around the roots never dries out completely by misting the plant regularly, or you can place the plant in a kitchen sink or tub to thoroughly soak the moss ball.
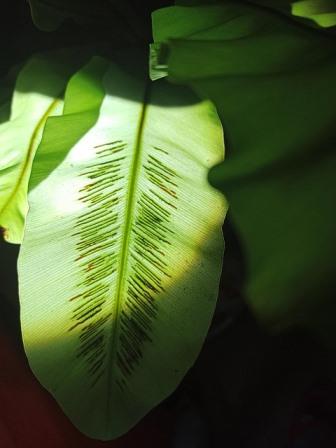 Asplenium spores Image by Lars from PixabayHow to propagate birds nest ferns?
For beginners, bird’s nest ferns can be tricky to propagate and many gardeners opt to rather purchase established plants.
Propagation is via spores, which look like fuzzy brown spots on the undersides of the fronds, and when they look especially plump and fuzzy, it's time to propagate. You will need a small paper bag, a small dish, sphagnum moss or palm peat, and plastic wrap or a clear plastic bag.
To collect the spores, cut off a frond and place it in a paper bag for a few days to allow the spores to fall off into the bag. Moisten some sphagnum moss or palm peat with water and place it in a small bowl with a little water to keep it moist but not waterlogged. Shake the spores onto the sphagnum moss, and cover the bowl with plastic wrap or fasten a clear plastic bag around it. Place in a warm, shaded spot and check that the moss remains moist by misting it when it feels a bit dry. Germination should occur in a few weeks, but can take a few months, so be patient.
Once the spores have germinated and small ferns have started to grow, you can remove the plastic cover. At this point, it’s important to provide the young plants with proper care. Place them in a bright location with indirect sunlight and maintain a consistent level of moisture in the soil.
Problems, pests & diseases of birds nest ferns:
Most of the problems, pest and diseases with birds nest ferns are related to an improper environment. Healthy, well cared for plants do not suffer from any serious pests or diseases, but they can be affected by some common insects, and outdoors they are susceptible to slugs and snails.
Rectify any environmental factors that may be causing stress to the plants then spray down your fern with a good quality pesticide, but try to keep it from pooling in the centre of the rosette. Because ferns are sensitive to some chemical insecticides, which damage their fragile leaves, a natural insecticidal soap is the best solution to combat pests on ferns.
Scale insects on birds nest ferns
A common pest that can trouble birds nest ferns is scale insects. These tiny pests attach themselves to the leaves and stems of the plant, causing damage by sucking out the sap, and if left untreated, scale insects can weaken the fern and hinder its growth.
Members can click here to read more about scale insects
Mealybugs on birds nest ferns
These small, soft-bodied insects are covered in a white, powdery substance and can quickly multiply if not addressed. Mealybugs feed on the plant’s sap, weakening it and causing stunted growth.
Members can click here to read more about Mealybugs
Spider mites on birds nest ferns
Spider mites can wreak havoc on your fern, causing extensive damage to the plant by piercing its cells and sucking out the contents. These tiny arachnids thrive in dry conditions and signs of infestation include yellowing leaves, webbing, and overall decline in the fern’s health. To prevent these pests, it’s important to maintain a humid environment around your fern and regularly mist its leaves.
Members can click here to read more about Spider Mites
Crispy leaf edges or curling leaves on birds nest ferns
Leaf curl and dry leaf edges can be a sign of insufficient watering or low humidity. Birds nest ferns prefer their soil staying lightly moist and drying out should be avoided. If crisping edges occur but you find the soil is still moist, you may need to raise the moisture levels in the air around your plant. This is easily achieved by placing your plant on a tray of moist pebbles or using a humidifier nearby.
Pale foliage or crisp brown spots on birds nest ferns
These symptoms are often caused by too much light or direct sunlight. If you notice that your fern is looking a little bleached or there are brown crisp patches on the leaves, then your plant may need to be relocated to a location with slightly less light. Birds nest ferns prefer medium to bright filtered light. If the lighting is correct but the plant still looks bleached, check the dryness of the soil, pale foliage is another sign that your plant may be thirsty.
Yellowing or black-tipped leaves on birds nest ferns
A few factors can cause yellowing, and often overwatering is cited as being the main culprit. However, if you find that leaves turn yellow infrequently, this is no cause for concern as this is the natural lifecycle of most plants. However, if yellowing happens on mass consider your watering regime. If you also start noticing black soggy tips on your fern, this is a clear sign of overwatering and can result in root rot. If this has occurred you will need to re-pot your plant.
Bad smell or mould on birds nest ferns
Bad smell or mould in the centre of your plant is caused by watering into the centre of your fern, resulting in the new fronds starting to rot. Try removing any dead debris or mould and allow the centre of the fern to dry out. Always be sure to only water the soil and not into the middle of the plant.
Fungus gnats on birds nest ferns
Fungus gnats are small flies that lay their eggs in wet soil and the larvae feed on the plant’s roots, leading to root rot which can potentially kill the fern. To prevent fungus gnats, it’s important to avoid overwatering your fern and to ensure that the growing medium has proper drainage.
Root rot on birds nest ferns
Root rot is a common disease that can affect birds nest ferns if they are overwatered or if the soil doesn’t drain well. It occurs when the roots are constantly sitting in water, leading to the development of harmful fungi that attack the plant’s roots.
Are birds nest ferns toxic?
Birds nest ferns are not toxic to birds, cats, dogs, or humans, making them a great choice if you have pets or children in the home.
Bird’s Nest Ferns - Asplenium
Why you should only grow Devils Ivy as an indoor pot plant
Devil's Ivy, Golden Pothos, Taro Vine - Epipremnum aureum
 Epipremnum aureum 'Marble Queen'Description, history and interesting facts about Devils Ivy
Epipremnum aureum originates from the forests of the island of Moorea, a volcanic island that is one of the most strikingly beautiful in French Polynesia. It forms part of The Society Islands, an archipelago in the South Pacific Ocean that includes the major islands of Tahiti, Moorea, Raiatea, Bora Bora and Huahine.
Click here to see Google images of the island of Moorea
Epipremnum aureum is a species in the Arum family Araceae, one of the largest plant families. It is commonly referred to as Devil's Ivy, Silver Vine, Golden Pothos, Ceylon Creeper, Solomon Islands Ivy, and Taro Vine. In its natural forest environment this evergreen tropical climber can grow up to 20m long and produces very large glossy leaves which emerge a lovely green and mature into stunning variegations of yellow or creamy-white.
As a juvenile the leaves are only several centimetres long and entire, with no indentations or holes, and the plant forms modest terrestrial colonies in the shade of the forest floor. As it matures it produces clasping roots arising from nodes and internodes, and prolific feeding roots, allowing it to adhere to the trunks of trees and climb to great heights in the canopy. The higher it grows the more light the plants receive, and the bigger the leaves become, maturing into oval to heart-shaped, pinnate leaves up to 90cm long with holes along the midrib. On mature specimens, a number of erect flower stalks appear together, each with a cream spathe marked with purple, surrounding the spadix.
Click here to see Google images of Epipremnum aureum
Cultivars of Devils Ivy
Today we are spoilt for choice with striking cultivars of devils ivy available in gorgeous variegations of green, cream, gold and white. Devils ivy is available from many online and retail stores, and because it is a favourite for aquariums, is also sold at aquatic pet shops.
Epipremnum aureum ‘Jade’ is a solid dark green type which does well in low light areas.
Click here to see Google images of 'Jade'
Epipremnum aureum is the regular green and golden form, and is also commonly called the ‘Golden Pothos’.
Click here to see Google images of ‘aureum’
Epipremnum aureum ‘Marble Queen’ has stark white variegated foliage with speckles of dark green colouring.
Click here to see Google images of ‘Marble Queen’
Epipremnum aureum ‘Goldilocks’ is a stunning lime-yellow colour and is also known as ‘Neon’.
Click here to see Google images of ‘Goldilocks’
Epipremnum aureum ‘Pearls and Jade’ is named for its striking green and white variegations.
Click here to see Google images of ‘Pearls and Jade’
Epipremnum aureum ‘Manjula’ with its lovely white and green variegations is one of the most sought after variegated plants, and it's no surprise why this rare plant is also called the ‘happy leaf’.
Click here to see Google images of ‘Manjula’
Is Devils Ivy (Epipremnum aureum) an invasive plant?
In the Arum family, to which devils ivy belongs, about 19 species are listed globally as invasive, and following the release of imported plants, devils ivy was widely planted in subtropical and tropical gardens of the world, but sadly, it flourished outside its natural range and naturalised itself.
Today it can be found as an unwanted guest in tropical and sub-tropical forests worldwide, including South Africa, Australia, South and Southeast Asia, and the West Indies, causing severe ecological damage in some cases.
Is Devils Ivy (Epipremnum aureum) an invasive plant in South Africa?
Due to the global invasive status of Epipremnum aureum, devils ivy has come under the spotlight in South Africa, where it is known to have has escaped garden cultivation and was detected growing wild in subtropical regions of the country, and especially in KwaZulu-Natal. This resulted in an evaluation of the species by the South African National Biodiversity Institute's Invasive Species Programme, which is responsible for detecting new invasions, and coordinating the eradication of high risk species.
One criterion commonly used to infer the status of a species as an invasion risk is evidence that it has a history of being invasive elsewhere, and especially under similar climatic conditions. Epipremnum aureum is regarded as a species of considerable concern because it has invaded several tropical and subtropical forests in Asia and the new world.
In South Africa it was spotted invading forest margins in Southbroom and Durban, and this is most concerning because we know that devils ivy is causing severe ecological disruptions in Sri Lanka, where it completely overtakes the indigenous plants growing on the forest floor and also clamours up high with its aerial roots.
Because it is able to spread and become established in dense monocultures on the ground, and climb up trees and telephone poles, devils ivy could easily invade our waterways or boggy areas, indigenous forests and green belts. And even if you live in suburbia, it may skip the garden fence and escape.
It rarely flowers in the wild, and is mainly dispersed by rooting effortlessly from cuttings and detached pieces of stem, so do not dispose of the plant with your municipal garbage, as it will grow and root on garbage dumps and landfills, which may encroach on natural areas.
Although studies undertaken by the South African National Biodiversity Institute's Invasive Species Programme concentrated only on KwaZulu-Natal, it is highly likely that there may be a high risk of invasion in the Eastern Cape, southern Cape and parts of the Mpumalanga and Limpopo regions. Epipremnum aureum also has a high probability of expanding its current range in KZN, primarily along the coast into neighbouring countries on Africa's eastern seaboard. Therefore, the Invasive Species Programme concluded that containment would be a viable strategy for managing Epipremnum aureum in South Africa.
Although this tropical species will not survive outdoors in very cold regions, and is therefore mainly a threat in our warmer, coastal, and frost free regions, it was proposed that Epipremnum aureum be listed as category 3 under the National Environmental Management Biodiversity Act (NEMBA). If it is eventually listed as invasive under this category, devils ivy will no longer be allowed to be sold or propagated in South Africa. Current garden plantings may remain, and naturalized populations will need to be managed.
Personally I believe as proud South Africans who cherish our beautiful country we should take action as soon as we are aware of such invasive plants. Why wait for it to become legally enforced - are we not responsible gardeners after all? I love this plant but feel strongly that it should only be sold and used as an indoor pot plant. I would be delighted if plant growers sold it with a label, warning consumers of the dangers of planting it outdoors. This could be a clever strategy for marketers with a conscience, as the younger generation of gardeners, who feel very strongly about this subject, would appreciate the honesty.
The impact of invasive species on our ecosystems is an interesting topic, and a great opportunity for educators to inform our children of their dangers. Be hands on and give them group projects to see how many wild populations of invasive plants they can spot, and then arrange an outing where they can help to eradicate the plants.
Let me know how you feel about this sensitive subject by contacting me here.
How to use Devils Ivy in the Home or Patio
Because devils ivy is an extremely easy to grow houseplant with long trailing or climbing stems that can grow up to 2.5m long indoors, giving a tropical vibe to any space, it became wildly popular all over social media.
A variety of plant sizes and containers are sold, from small starter plants to large specimens. Its ease of growth makes it a good choice for offices and shopping malls, and it looks fantastic cascading down from hanging baskets or tall pots, and is just as enchanting climbing up a support like a moss pole.
It can tolerate a variety of conditions, but to really bring out the variegations its best placed in a bright spot, and as a container plant, it generally retains its smaller juvenile leaf shape, but if it is gown under optimal conditions indoors or in a greenhouse it can grow quite large and will produce much bigger leaves.
An added bonus is that devils ivy is listed as one of the top ten best air purifying plants – it’s great at filtering indoor pollutants such as formaldehyde and benzene from the air.
How to grow Devils Ivy in Water or an Aquarium
Devils ivy grows effortlessly in water, but cannot be fully emerged in an aquarium. Rather place the plant above the water and allow the roots to grow into the water. This is beneficial both for the plant and the aquarium as it absorbs many nitrates and uses them for growth.
In fact, this plant will not only provide excellent biological filtration for your aquarium, and lovely long roots for your fish to swim around and hide in, it also looks so lush and tropical growing outside of the tank. Devils ivy is also generally considered safe for aquarium snails, as long as the leaves are kept above the waterline to prevent them from rotting.
 Epipremnum aureum How to Grow and Care for Devils Ivy indoors?
Caring for your devils ivy is extremely easy if you understand its needs, and once you bring it home its extremely important to find a place that both you and your new houseplant loves!
How much Light does Devils Ivy require?
It does best in bright indirect light indoors, and the more light the plant gets, the more pronounced its leaf markings become. Avoid too much direct sunlight which may scorch the leaves. Devils ivy is a resilient plant that will also tolerate lower light levels, but in very low light the variegated cultivars will become almost entirely green. The solid green type ‘Jade’ performs the best in low light conditions indoors.
What Temperature does Devils Ivy require?
Devils ivy loves warm environments and grows well in normal room temperatures, around 18 to 24°C. If kept a bit on the dry side it will take temperatures down to 10°C, but do not allow the temperature to drop below 10°C. Avoid placing it in a room that has great fluctuations in temperature, as this makes it difficult for the plant to settle into its environment. Also, keep it away from cold draughts.
How much Humidity does Devils Ivy require?
Because it’s a tropical forest plant, devils ivy thrives in warmth and humidity, and although it can get by with normal or even dry air, if you want to make it feel truly at home, you can increase humidity levels. Devils ivy will grow well with normal humidity levels around 40% but will thrive if the humidity is raised to around 60%.
How to Create a Humid Environment for Devils Ivy?
If you live in a hot and dry region, investing in a humidifier would help a lot. Mist spraying the foliage down regularly with tepid water will add humidity around the foliage and also keep the plant clean and healthy.
Grouping your houseplants together also helps to create humidity, as lost water from one plant during the process of transpiration can be picked up by another plant. Adding a decorative bowl of water to the display also works well, as does filling the plants drip tray with water, and elevating the bottom of the pot by standing it on river sand or fine gravel to ensure that the pot is not standing in water.
Keep your devils ivy away from air conditioning units and other drying heat sources like heaters or fireplaces.
What Potting Soil does Devils Ivy require?
Devils ivy is not very fussy about the potting soil it grows in as long as it is light, aerated, well-draining, and nutrient-rich. Good quality potting soils work well and you can also mix in some cacti mix or orchid mix, perlite or palm peat to lighten it up further.
How much Water does Devils Ivy require?
Devil’s Ivy likes its topsoil to be dry between watering’s, and on average, during the summer growing season a weekly watering should suffice. If your plant is growing in a warm room with bright light, expect to water it more often than one growing in low light. And, as with the majority of houseplants, water less during the cold winter months.
If your tap water is of a good quality it should be fine to water your plants with, but like all indoor pot plants, devils ivy thrives on rainwater or filtered water, as tap water may contain too many chemicals such as chlorine that can affect your plant.
Signs of overwatering include yellowing leaves and black stems, while under watered plants will wilt as the potting soil dries out.
How to Fertilise Devils Ivy?
During the summer growth season, foliar feed monthly with a liquid fertiliser for leafy plants. Allow the plant to rest without food during the cold winter months.
How to Prune Devils Ivy?
If the vines grow too long you can selectively prune them back to a reasonable length, and pruning will quickly promote new growth. Pruning directly at the leaf nodes can help the plant to form more bushy foliage, and plants can even be cut back to 5cm from the soil line if necessary. However, the easiest way to get the desired bushy shape is simply to grow several plants in one pot. Rotate the pot occasionally to encourage even growth.
Since devil's ivy is poisonous, always wear gloves when working with the plant – especially when pruning and repotting.
How to Repot Devils Ivy?
Devil's ivy likes to be cramped and prefers to have its roots nice and tight in a pot. However, if it likes its environment it can grow very quickly and may need to be re-potted once every 12 to 18 months, and the best time to do this is in spring or early summer. Look for signs that it has outgrown its pot by checking for roots sticking out of the drainage holes. Stunted growth is also a sign that it needs fresh soil.
You may plant into a slightly larger pot, or you can simply take the plant out of its pot and gently tease all the old potting soil off the roots before replanting into the same pot, using fresh potting soil. If the roots need pruning back a bit to fit into the original pot, you can do this, but then it would be wise to lightly prune the top of the plant as well.
Water well after repotting and keep the soil evenly moist but not soggy until the plant is fully re-established in its fresh soil. Misting the foliage down regularly will also help it perk up quicker.
Never plant devils ivy into a pot much larger than it already inhabits as this could kill the plant, or it will stop growing leaves and spend all its time just growing roots to fill up its new pot.
How to Propagate Devils Ivy?
This plant is easily propagated from cuttings of stems with leaves and aerial roots, or by air-layering. The vines will root in water, potting soil or vermiculite within 3 to 4 weeks and under warm temperatures buds can start to grow within 1 to 2 weeks. Plant into containers once the roots are well developed, and to grow a bushy plant its best to plant several rooted cuttings together in a single pot.
What Problems, Pests and Diseases affect Devils Ivy?
Healthy and well-cared for plants generally have very few problems but they can occasionally be affected by pests or diseases. As with all houseplants, you should regularly and thoroughly inspect your plants for any infestations, and don’t forget to check the undersides of the leaves as this is where many pests hide. This will enable you to catch infestations early and before they become a larger problem down the line.
Why are the leaves of my Devils Ivy fading and losing their variegation?
Fading leaves that are losing their variegation indicate that the plant needs more light. Move it to a brighter spot, but be careful to avoid too much direct sunlight which can burn the foliage.
Why does my Devils Ivy have drooping leaves?
Drooping leaves are mainly caused by infrequent or insufficient watering, and a lack or humidity. Water more frequently and mist spray the foliage with water regularly.
Why are the leaves of my Devils Ivy turning yellow and dropping off?
Yellowing and dropping of leaves can be caused by overwatering, or by cold draughts which cause the plant to go into shock. Adjust your watering, check for any cold air currents and move the plant if necessary.
Why does my Devils Ivy have soft, limp leaves?
Green leaves that go limp and soft as if they are starting to rot, and then turn black, are a sign of overwatering, which can lead to root rot. Symptoms of root rot are brown or non-existent roots, and if you take your plant out of its pot and notice that root rot is present, take as many healthy cuttings as you can find to start a new plant before it dies. However, if you can still see white roots, remove the plant from its container and repot with fresh soil, or place it in a sieve or on a saucer to allow for good air circulation, and let the soil to dry out, before putting it back into its container.
Why are there brown patches on the leaves of my Devils Ivy?
If your plant is growing well and suddenly brown patches appear on the leaves, usually located in the centre of the leaf, this is likely a sign of an abrupt change from very high temperatures to moderate or low temperatures.
Why does my Devils Ivy have crispy, brown leaf tips?
If you are watering correctly, crispy, brown leaf tips are a sign of low humidity. Mist the plant often with tepid water or invest in a humidifier. However, blackening of the leaf margins can also be caused by overwatering, or excess fertiliser, resulting in a build-up of salts in the soil.
How to detect and control Mealybugs on Devils Ivy?
Mealybugs appear as white, cottony masses, frequently in the leaf axils or on the lower surfaces of leaves, and even in the roots. Mealybugs are common on indoor pot plants, and infected plants will show stunted growth, yellowing of the leaves, distorted plant tissue, and leaf drop.
Biogrow Neudosan; Biogrow Bioneem; Biogrow Pyrol; Margaret Roberts Organic Insecticide; and Oleum, all work well for mealybugs.
Members can click here to read more about mealybugs
How to detect and control Scale Insects on Devils Ivy?
Scales are tiny parasitic insects that adhere to plants and live off the plant's sap. They look like bumps and are often mistaken for a disease. There are some 7,000 species, varying greatly in colour, shape and size. Scales often go unnoticed by the gardener, but they can do damage out of all proportion to their size. They can quickly infest leaves, twigs, branches and fruit, and are found all year round.
Biogrow Neudosan; Biogrow Bioneem; Biogrow Pyrol; Margaret Roberts Organic Insecticide; and Oleum, all work well for scale insects.
Members can click here to read more about scale insects
How to detect and control Spider Mites on Devils Ivy?
Spider mites occasionally infest devils ivy but can easily be controlled with thorough cleaning and misting of the plants, together with frequent applications of insecticidal soaps. Populations can explode during hot, dry weather, and they lay their eggs on the undersides of the leaves where it is relatively dry, and are so minute that most people don't even see them. Signs of infestation are fine white spider webs on the plant, a mottled, silvery look to the top of the leaf, or a severe yellowing or bronze colour to the leaves, leaves dropping off, and leaf curl.
Biogrow ‘Bioneem’ comes from the Neem tree and is a great because it is used to control a wide range of insects, (up to 200 types) including red spider mites and mealybugs.
Members can click here to read more about spider mites
Is Devils Ivy (Epipremnum aureum) toxic for humans or pets?
Because it contains calcium oxalate, every part of this plant is poisonous to pets and humans if ingested in large quantities, so ensure that this houseplant is not nibbled on by any pets or young children. If it is, it can cause burning in the mouth and symptoms such as throwing up and stomach aches. Call a doctor or vet if you see any symptoms.
The sap may also be irritating to the skin, so always wear gloves when working with this plant, and especially when pruning and repotting.
Staghorn Ferns will add a whole new dimension to the garden
Staghorn Fern, Elkhorn Fern - Platycerium spp
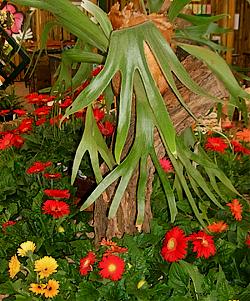 Common Staghorn FernDescription, History and Interesting Facts about Staghorn Ferns
Staghorn ferns are a group of about 18 species in the genus Platycerium which are native to the moist, tropical rainforests of Australia, Malaysia, Africa, and America, but a few species have adapted to dry habitats, and will tolerate colder weather and more sun. In their places or origin they grow on trees and rocks, and are therefore known as epiphytes.
The genus name Platycerium comes from the Greek “platys” meaning flat, and “ceras” meaning horn; and both common names “staghorn fern” and “elkhorn fern” are referring to the fertile fronds that resemble the forked antlers of male deer or elk. They are often used interchangeably, although those with thinner fronds are most often called elkhorn ferns.
All staghorn species produce both basal and foliar fronds, but the length, width, and amount of division of the fronds varies greatly between species. The fertile green fronds may be erect or drooping, and the shape of the ‘shield’ produced by the brown overlapping basal fronds also varies within the species from rounded to kidney-shaped, and some species have basal fronds that grow upright to form a ‘nest’ to trap falling organic matter. Most species spread continually by producing offsets, but some are solitary, meaning they don’t produce offsets.
Platycerium species
The commonly grown species like Platycerium bifurcatum are easy to find, but many are rarely found in shops and are only offered by specialised nurseries.
The Common Staghorn Fern or Elkhorn Fern (Platycerium bifurcatum)
This species is the one most commonly cultivated as an ornamental plant, as it is probably the easiest to grow. It is a native of Java, New Guinea, and south-eastern Australia in New South Wales, Queensland and on Lord Howe Island. In many countries it is cultivated outdoors and has naturalised itself in places like Florida and Hawaii, where it is now considered an invasive species on the islands.
The common staghorn occurs naturally in and near rainforests, and does best with year-round warm temperatures that never drop below 5°C. Therefore, it can only be grown outdoors in very mild climates, and in all other climates it does best as a houseplant that can be moved outdoors during the summer.
The plant grows from short rhizomes (segmented, subterranean, modified stems arising from a adventitious buds in the crown zone) that produce two types of fronds, sterile, non-productive fronds and fertile green fronds. The sterile brown fronds form the clasping, shield-like structures at the base of the fern, and can grow up to 45cm long. They are flattened against the tree to protect the rhizomes and the tufted roots, and also collect debris that provides nutrients for the plant. Initially these basal fronds are a dull green and succulent, but with age they become brown and papery.
The fertile brighter green fronds grow about 90cm long, and each frond divides into two segments a number of times along its length. Spores are produced on the undersides of the tips of these fronds, and these spore producing areas are a tan-brown colour with the texture of velvety cloth.
Each plant is composed of a mass of plantlets, called suckers or pups, all crammed together with the fronds of neighbouring plantlets overlapping one another. And, as the rhizomes expand out and produce new sterile fronds, the plant will spread continually.
Click here to see Google images of Platycerium bifurcatum
Silver Staghorn Fern, Silver Elkhorn Fern (Platycerium veitchii)
The silver staghorn fern is native to Queensland Australia, and although it grows slowly with time it can reach enormous sizes. With the right care it can live outdoors or indoors for decades, producing its lovely fuzzy, blue-green fertile fronds that hang down up to 2m from the brown shields that can spread up to 1m wide.
Platycerium veitchii is a very hardy species and although it is easy to grow as Platycerium bifurcatum, perhaps it is less common in cultivation because it is slow growing. Few species tolerate more sun that this one, as in Australia it is adapted to growing on open rock faces in semi-arid climates. It is also known to be cold hardy and will tolerate temperatures down to about -3°C without damage.
Click here to see Google images of Platycerium veitchii
American Staghorn (Platycerium andinum)
This is the only species from the Americas, and the only staghorn fern native to the New World. It can be found growing in the seasonally dry forests found on the Amazonian slopes of the Andes Mountains of Peru and Bolivia.
This species has a tall, slender form, and produces loosely overlapping sterile fronds forming a flaring crown-like shield. Long, narrowly segmented, lobed and prominently veined fertile fronds hang down up to 1.5m or more. New pups tend to form horizontally, eventually forming a complete circle around the trunk of the host tree. This is called a ‘ring type basket’, and it is estimated that it takes 10 to 20 years for a crown to form like this in the forest.
Click here to see Google images of Platycerium andinum
Crown Staghorn (Platycerium coronarium)
The crown staghorn fern grows primarily in the wet tropical biome of maritime Southeast Asia and Indochina, and throughout the East Indies. It has broad sterile brown fronds, and two kinds of green leaves: Foliage leaves which are broad and upright in habit; and spore bearing leaves which are narrow, pendulous, and dichotomously lobed, forming a long and twisted mass up to 4.6m in length. Coronarium means ‘crown’, describing the shape of the mature mass of green shield fronds that form rings around the entire trunk of the host tree, resembling a crown.
Click here to see Google images of Platycerium coronarium
Giant Staghorn (Platycerium grande)
The giant staghorn is one of the two staghorn ferns native to the Philippines. Along with Platycerium coronarium it is endemic to the island of Mindanao, in the provinces of Zamboanga, Lanao and Davao. It is a solitary species which does not produce pups. The upright fan-shaped sterile fronds form a nest up to 1m or more across; and the large green fertile fronds are unbranched and can hang down up to 1.8m.
Due to over collection and the difficulty of the spores to germinate under natural conditions, in vitro technique is necessary to ensure mass production of this plant species, and the local government has categorized Platycerium grande as a critically endangered species.
Click here to see Google images of Platycerium grande
Staghorn Fern (Platycerium hillii)
Platycerium hillii is native to tropical and temperate areas of South America, Africa, Southeast Asia, Australia, and New Guinea. There appears to be two forms of fertile green fronds; one form has long narrow fingers on a broad frond, and the other form has short fingers on a broad frond. The fronds grow about 60 to 90cm long, and both the sterile shield fronds and the fertile green fronds are broad with wide bifurcations. Platycerium hillii forms and cultivars are very hardy and produce many pups. Cultivars include: Platycerium hillii 'Hula Hands' which has even shorter fingers on a broad frond; Jimmie, Drummond, Pumilum, Panama, Hula Hands, as well as a few unnamed variants.
This staghorn does not tolerate drought and heat well. It also has very little tolerance for hot sun, though older plants can take some in the mornings.
Click here to see Google images of Platycerium hillii
Australian Staghorn Fern (Platycerium superbum)
This native of Australia is found naturally in tropical and subtropical lowland rainforests in Queensland and north-east New South Wales. It is widely cultivated as an ornamental plant for gardens, and can also be found in parts of Indonesia, Malaysia and New Guinea. During the 1990’s, the fern was also discovered on the Hawaiian Islands where it is now considered a "problem” species.
Platycerium superbum is a stunning species that can reach truly massive proportions. The sterile fronds grow erect, creating a crown-like umbrella 1m wide, under which the flaring 2m long fertile green fronds hang down in a pendant fashion. It is touchy about cold, heat and overwatering and because it is solitary, it doesn’t produce offsets, and is propagated only from spores.
Click here to see Google images of Platycerium superbum
 Platycerium bifurcatum Staghorn Fern San Diego Zoo California Picture courtesy James Gaither from flickr
How to Use Staghorn Ferns in the Garden and Home
Staghorn ferns add an eerily beautiful, almost primeval look to both indoor and outdoor spaces.
In nature staghorn ferns grow as epiphytes by attaching themselves to trees, and in suitable climates, letting them grow directly from a nook or crotch of a living tree branch or trunk, grouped together with other exotic epiphytes like Birds Nest Ferns, and Bromeliads like Billbergia and Aechmea, will add a whole new dimension to the garden. As a final touch, drape Spanish Moss (Tillandsia usneoides) over the tree limbs. It develops into large and impressive clumps of very long pendulous strands of fine, silvery-grey foliage, creating a mystical living curtain, and it won’t be long before your garden has that exotic rainforest look and feel.
Members can click here to read more about Birds Nest Ferns
Members can click here to read more about Bromeliads, Tillandsia, Billbergia & Aechmea
Small plants are often sold growing in pots, but mounting staghorn ferns onto beautiful pieces of driftwood, slabs of bark, wood or cork, is the best method of growing them. Mounting not only shows off their distinctive looks best, but also ensures perfect drainage. Staghorn ferns also look fantastic when grown in hanging baskets, and are often sold in Kokedama, a Japanese word that means “moss ball”, which is simply the art of binding plants into green, mossy orbs.
Is the Staghorn Fern Safe for a Bird Aviary?
Platycerium bifurcatum is recommended as safe for birds and a very good aviary plant. It can be mounted onto wood or a living tree, or planted into a hanging basket.
Indoor & Outdoor Cultivation of Staghorn Ferns:
In their natural environment most staghorn ferns thrive in bright indirect light, warm temperatures, moderate humidity, and consistent moisture, so if you are growing these ferns at home, be it indoors or outdoors, the best results are achieved if you can try to mimic the conditions they love.
How Much Sunlight do Staghorn Ferns Need?
In the garden the best position is in light shade with occasional patches of sunlight. Indoors they thrive in bright indirect light.
What Temperatures do Staghorn Ferns Require Indoors and Outdoors?
Indoors staghorn ferns do best with normal household temperatures of 10 to 16°C or higher.
In warm regions where the temperatures never drop below 5°C, they can be cultivated as ornamental garden plants, and in temperate regions they can be grown in sheltered locations outside. Platycerium bifurcatum and Platycerium veitchii are the most cold-tolerant species, and although the plants will survive light frost and temperatures below freezing for very short spells, in cold locations its best to move them indoors before night time temperatures drop in autumn.
Most Staghorn ferns do not like it hot and dry and arid heat is a challenging factor if humidity is low. You can correct this problem by setting up automatic misters, as most of these ferns will tolerate high heat as long as they are somewhat moist.
What is the Best Growing Medium for Staghorn Ferns?
In nature staghorn ferns grow as epiphytes by attaching themselves to trees; therefore mounting them using sphagnum moss is the best method of growing them, both indoors and outdoors. Mounting also ensures that the drainage is perfect.
Small plants can be grown in pots with a very well-drained growing medium like orchid mix.
How Much Water do Staghorn Ferns Need?
Water is like lifeblood to these ferns, and they need a fair amount of it, but be careful not to overwater your plants as they don’t do well in a constantly soggy growing medium. And because they absorb water through their fronds as well as their roots, to get them to grow luxuriantly with healthy, shiny leaves, spray the plants regularly with a fine mist spray of water, or rainwater. Mounted specimens will need frequent misting, and if grown indoors, will appreciate an occasional good soaking in a basin of water.
In nature water and debris collects in the crowns of these ferns, but when growing them indoors its best to avoid overwatering directly into the centre of the plant, as too much water in the crown can encourage mould and rot in the dense nest.
In warm summer weather the plants will need more frequent watering than during the winter months. As temperatures decrease in autumn, gradually start to water less, and during the coldest months you may only need to water every couple of weeks. However, if they’re in a room which gets very warm because of heaters etc. be fastidious about checking the soil as it will dry out quicker.
If the quality of your tap water is good you can use it, but as with all houseplants, rainwater is always best.
How Much Humidity do Staghorn Ferns Need?
These tropical rainforest plants need moderate humidity, and if you live in a humid region this will not be a problem. However, in dry regions providing sufficient humidity can be a challenge, both indoors and outdoors.
How to Create a Humid Environment for Staghorn Ferns?
Frequent misting when ambient humidity is low will help a lot, and investing in a humidifier will go a long way in keeping your plant happy.
How to Fertilise Staghorn Ferns?
Plants can be fertilised monthly during the warmer months using a specialist foliar feed for ferns, or any other liquid fertiliser for foliage plants, diluted to half strength. Foliar feeds are easy to apply when misting down your plant.
Is Epsom Salt Good for Feeding Staghorn Ferns?
Many gardeners advocate adding Epsom salt to your fern's water occasionally, as it can aid in the absorption of other nutrients present in the soil.
Are Bananas Good for Feeding Staghorn Ferns?
Banana peels won’t do any harm and can contribute lots of potassium and a little phosphorus to the nutrient needs of your staghorn fern. However they contain very little nitrogen, which is also vital for good growth.
Are Brewed Coffee Grinds Good for Feeding Staghorn Ferns?
Yes, coffee grounds can benefit staghorn ferns, as they provide nitrogen, which helps leaf growth. However, while it may be tempting to directly apply freshly brewed coffee grounds to your staghorn fern, this is not advised as fresh grounds are quite acidic and can potentially throw off the pH balance of your growing medium. It’s best to compost them first to break down and neutralize some of the acidity, and then to use it sparingly.
Are Used Teabags Good for Feeding Staghorn Ferns?
Tea bags are excellent slow release fertilisers that will do no harm if you occasionally place a few behind your staghorn fern.
How to Prune a Staghorn Fern?
Withered fertile fronds can be pruned off, but the brown basal fronds should never be removed as they help anchor and protect the plant and will eventually fall off naturally.
How to Mount a Staghorn Fern?
Staghorn ferns are quite easy to mount onto driftwood, a wooden board, cork or bark, but make sure you use a hard wood or bark that won’t decompose quickly, and you will also need to drill a hole into the mount to fit a hanging bracket.
For mounting you can use sphagnum moss which is available from some garden centres for use in terrariums, as well as from bonsai growers and even some pet stores. Online you can order sheets of living moss which are perfect to use. The fern is secured to the support by fishing line, wire, plastic mesh or other materials.
Take your fern out of its pot and gently shake off the excess soil. Loosely secure the plant to its support so that you still have some space to gently push moistened moss behind the brown basal fronds. Once you are happy with the arrangement, secure the plant permanently to its mount. Always wrap over and through the brown, non-fertile basal fronds. Do not wrap over the soft, green fronds as they are easily damaged. As new basal fronds are produced and grow over the old fronds, you will no longer see the fastening material. Mist spray thoroughly to ensure the root ball is completely moist, hang and enjoy!
How to Propagate and Divide Large Staghorn Ferns?
If well cared for, a staghorn fern can live many decades, and it may require periodic division or remounting on a larger base to support its increasing weight.
To divide a fern, one must first identify a sucker or pup, and carefully cut it off with a sharp knife or scissors, making sure that each piece has some roots as well as fertile and sterile fronds. These suckers can be found by looking under the brown shield fronds to find the little rhizomes coming off the larger plant. It is best to cut into the fern when the shield frond is brown, with no green or fuzziness left in it. The centre of each rosette of leaves is often called the ‘eye', and large ferns have many eyes. All these can potentially be divided into individual ferns, but the fewer pieces one cuts the fern into the more likely each section will survive. Mount or plant the sucker immediately as described above. New divisions should be kept warm and moist until established, which may take a long time.
How to Propagate Staghorn Ferns from Spores?
Staghorn ferns like Platycerium bifurcatum can be propagated from spores but this is a slow process. Other species may be more challenging to propagate and are better purchased from specialty growers.
To collect the spores, place the part of a frond that is producing spores into a brown paper bag, and leave until there is brown dust in the bag, these are the spores. Fill a pot with sphagnum moss, palm peat or peat moss, and pour boiling water through the growing medium to sterilize it. Immediately place a glass or plastic sheet over the pot to keep it sterile, and once the growing medium has cooled down, spread the spores evenly over the surface, immediately replacing the cover.
Stand the bottom of the pot in a container with a shallow layer of water, and place the pot and container in a warm position where it will receive indirect sunlight. Once the spores have germinated a green scum will initially appear over the surface of the peat, and after a period of weeks to months, the fronds will begin to appear, and the glass cover can be removed. Once the new plants have grown larger, they can be transferred to their permanent place.
Problems, Pests & Diseases of Staghorn Ferns:
If staghorn ferns are happy where they are growing, and are cared for correctly, they suffer from few pests or diseases. However, as with all plants, they are susceptible to certain insects like spider mites, scale insects and mealybugs. Snails and slugs can also ravage them.
What is the Safest Insecticide to Use on a Staghorn Fern?
To eliminate or prevent insect pests on ferns, lightly spray the plant with insecticidal soap. Insecticidal soaps are effective across a wide range of insect types, but they work best on small, soft-bodied species such as aphids, mealy bugs, greenfly, scale insects, and spider mites. Regular preventative spraying is recommended, as once mealybugs and scale insects mature past their crawler stage and fix themselves to the plant, eliminating them is much harder, and you may have to use products containing ‘carbaryl’.
Can Oil-based Insecticides be used on Staghorn Ferns?
Oil-based sprays are often recommended to control insects like scale on plants, but is not recommended for staghorn ferns as oil-based insecticides can burn or injure ferns.
How to Detect and Control Scale Insects and Mealybugs on Staghorn Ferns?
Mealybugs and scales are the two main pests that can sometimes infest staghorn ferns. Mealybugs appear as white, cottony masses, frequently in the leaf axils or on the lower surfaces of leaves, and even in the roots. They are common on indoor pot plants, and infected plants will show stunted growth, yellowing of the leaves, distorted plant tissue, and leaf drop.
Scales are parasitic insects that adhere to plants and live off the plant's sap, and if populations are severe and left untreated they can eventually kill the plant. Scales have hard armour-like shell coverings in different colours shapes and sizes, and once out of the crawler stage, remain affixed to a portion of the staghorn. Scales often go unnoticed by the gardener, but they can do damage out of all proportion to their size, and are found all year round.
Using an insecticidal soap works to control mealybugs and scale that are in their crawler or moving stage. However, once they have found their permanent place on the fern and stop moving, they are harder to control. Because staghorn ferns do not like oil-based sprays, you may have to use a product containing ‘carbaryl’, like Efekto Karbaspray. Thoroughly cover the infested areas, and always strictly follow the label instructions concerning application and frequency of use.
Members can click here to read more about Mealybugs
Members can click here to read more about Scale Insects
How to Detect and Control Spider Mites on Staghorn Ferns?
Spider mites can wreak havoc on your fern, causing extensive damage to the plant by piercing its cells and sucking out the contents. These tiny arachnids thrive in dry conditions and signs of infestation include yellowing leaves, webbing, and overall decline in the fern’s health. To prevent these pests, it’s important to maintain a humid environment around your fern and regularly mist its leaves. To control or eliminate them, spray regularly with insecticidal soap.
Members can click here to read more about Spider Mites
How to control Snails and Slugs on Staghorn Ferns?
Slugs and snails chew holes in the fronds and leave behind those characteristic slimy trails. A sprinkling of snail pellets on top of the organic matter in the back of the fern will discourage most of these mollusc pests. And, because they are most active at night they can be captured by hand with the help of a torch.
How to Keep Squirrels Out of Staghorn Ferns?
When grown outdoors in the nook of a tree or on tree trunks where squirrels frequent, they might be tempted to burrow and nest around the root system of your staghorn fern. Wild birds may also be inclined to do the same, so try to protect your plants from the damage they can cause by planting them into hanging baskets enclosed in wire mesh that is about 1cm, and if you dislike the look of mesh over the pot, set the wire around the fern's root system before placing it in its hanging basket.
Relocate your staghorn to a tree or post where you can more easily control a squirrels access. A support structure that is too close to other trees, or with branches close to house roofs, sturdy wires or fence posts, makes it all too easy for squirrels to leap onto the structure from above the ground. Hang wind chimes from the bottom of your hanging basket, or from a nearby point on the tree or post housing your fern; the noise helps discourages these skittish pests. An ultrasonic squirrel repellent also works well.
DIY squirrel deterrent recipes can be found online, and many gardeners advocate using a generous amount of ground cinnamon or cinnamon oil, mixed with cayenne extract or peppermint oil, and warm water, which must be applied to affected areas to ward squirrels away. As rain can wash away the scent, it needs to be reapplied regularly to be effective.
The Southern African Tree Squirrel, also known as Smith’s Bush Squirrel, can be found in Mpumalanga, Limpopo, Gauteng, North West and extreme northern Kwazulu-Natal. It is a common species in bushveld and woodland, and is especially plentiful in riverine bush and mopane veld.
The Grey Squirrel from North America is classified as invasive in South Africa, and is especially problematic in the Western Cape and KwaZulu-Natal. It is a NEMBA Category 1a in KwaZulu-Natal, and Category 3 elsewhere.
Why are the Fronds of my Staghorn Fern Turning Yellow?
Leaf yellowing is one of the first signs of overwatering. Like many tropical plants, staghorn ferns use chlorophyll in their leaves to convert sunlight into usable energy. Unfortunately, leaf oedema and damage are caused by too much moisture, which breaks down chlorophyll. Excessive soil moisture also rots the roots, preventing the plant from absorbing essential nutrients. Adjust your watering.
What is Leaf Oedema?
Oedema is a disorder of plants caused by the roots taking up more water than the leaves can transpire. This excess water ruptures the cells, particularly on the undersides, and leads to water-soaked patches that turn corky and unsightly. It is common on houseplants, greenhouse plants, and other plants sheltered under plastic. Conditions preventing effective water loss include periods of cloudy weather with low light intensity, or an increase in relative humidity resulting from cooling air temperatures, and poor ventilation. It has also been associated with the use of oil-based horticultural sprays that interfere with normal water loss.
Oedema shows as small translucent, fluid-filled blisters on the undersides of older leaves, often beginning at the leaf margins. When observed against the light, oedema lesions will appear lighter in colour than the surrounding leaf tissue. The blisters may increase in size or merge, burst, and then scar, turning a tan colour and corky in texture. Some, and eventually all the leaves may shrivel, or roll up before falling off.
Although oedema is typically not fatal, to help prevent it adjust your watering schedule and water less frequently during cool and cloudy, or humid weather. Water in the morning so that the soil can drain before nightfall when cooling temperatures can lead to increased relative humidity. Use a growth medium that drains well. Reduce relative humidity near the leaf surface by increasing plant spacing and air circulation. Increasing light and air temperatures also helps to increase normal transpiration of the fronds.
Click here to see Google images of Oedema in Plants
How to Detect and Treat Rhizoctonia Fungal Infection on Staghorn Ferns?
Staghorn ferns are susceptible to rhizoctonia, a soil-borne fungus known to cause root rot, stem rot, damping-off, and in some cases a blight of the leaves. On staghorn ferns, the bases of the fronds begin to blacken, and black spots appear on the leaves. This disease is primarily problematic in wet and warm conditions and can quickly spread throughout the fern, eventually killing it.
Most of the time the problem occurs due to overwatering and keeping the fern too wet. To limit the spread reduce humidity around the plant and withhold water to promote drier conditions. Prune away affected fronds and roots, apply a fungicide like copper soap, strictly following the label instructions on its application and frequency of use. It may even be necessary to repot or remount your fern, sterilising the pot or mount, and using fresh growing medium. Adjust the watering schedule as needed, and remember, in cooler weather your plant will require less water.
Click here to see Google images of Rhizoctonia on Staghorn Ferns
Why are the Tips of my Staghorn Fern Turning Brown?
If the tips of the fronds begin to brown, you are under watering the plant. Increase the frequency of watering and mist the plants down regularly.
Is Platycerium Toxic?
The Staghorn Fern is considered non-toxic and safe around children and animals.
What are the Health Dangers of Ferns?
All ferns release spores, and if people with compromised immunity, like those with chronic obstructive pulmonary disease (COPD) inhale fern spores they can develop mould infections in the lungs.
You can grow apples at home, even in a small garden
Apples, Orchard Apple - Malus domestica
 Apple Dwarf 'Royal Gala' Picture courtesy www.justberryplants.co.zaDescription, History and Interesting Facts About Apples
Apples are members of the Rose family (Rosaceae), and the apples we know today are varieties of the species Malus domestica, which is descended from a species of wild apple known as Malus sieversii, which can still be found growing wild in the mountains of Central Asia, in southern Kazakhstan, Kyrgyzstan, Tajikistan, and north-western China.
Malus domestica is thought to have been domesticated 4 000 to 10 000 years ago, and cultivation of the species most likely began on the forested western slopes of the Tian Shan Mountains, a large system of mountain ranges in Central Asia. Cultivation continued over millennia, facilitating the transfer of genetic material from other apple species into the open-pollinated seeds. Soft dessert apples like Malus asiatica and Malus prunifolia have been cultivated for thousands of years in China, and are believed to be hybrids between Malus sieversii and Malus baccata.
Marco Polo’s journeys to the East, and the establishment of The Silk Road, an ancient trade route linking China with the West, led to these species being introduced to Europe. Hybridization between the species continued with Wild Crabapples from Siberia (Malus baccata), (Malus orientalis) from the Caucasus, and (Malus sylvestris) from Europe. Significant exchange with the Crab-apple (Malus sylvestris) resulted in many populations of apples being more related to crab-apples than to domesticated apples (Malus sieversii).
The earliest evidence for domesticated apples (Malus domestica) in Europe is from the Sammardenchia-Cueis site in north-eastern Italy, where apple seeds were found that were carbon dated to around 4 000 BC. There was substantial apple production in the Greco-Roman era from around the 8th century BC to the 5th century AD. And, although it is unclear when apple tree grafting was invented, it was certainly known then.
In the 16th century AD many Europeans visited or moved to the newly-found Americas and some also searched for new routes to Asia. The Spanish introduced apples to the indigenous people of the Chiloé Archipelago, a group of islands lying off the coast of Chile, in the Los Lagos Region, and the trees adapted well. The only apples indigenous to North America are crab apples, which were once called "common apples", but in the 17th century domesticated apples were introduced by the colonists, and by 1625 the first apple orchard on the North American continent was planted in Boston by Reverend William Blaxton.
The seeds of apple cultivars spread along the Native American trade routes, and were cultivated on many colonial farms, and by 1845 a United States Apples Nursery Catalogue sold 350 of the best cultivars, showing the proliferation of new North American cultivars by the early 19th century. The development of large irrigation projects in Eastern Washington in the 20th century allowed for the development of the multibillion-dollar fruit industry, of which the apple is still the leading product.
Winter apples, picked in late autumn and stored just above freezing, have been an important food in Asia and Europe for millennia, and until the 20th century, farmers stored apples in frost-proof cellars during the winter for their own use, or for resale. Later, improved transportation of fresh apples by train and road replaced the necessity for storage. Today, the controlled atmosphere facilities used to keep apples fresh year-round using high humidity, low oxygen, and controlled carbon dioxide levels, were first used in the United States in the 1960’s.
Apples have been produced commercially in South Africa since the 1880’s and have been exported from South Africa to the United Kingdom since the 1890’s. Initially, orchards were developed in the Western Cape's deciduous fruit production regions, but today apples are produced throughout the country.
The Domestic or Orchard Apple (Malus domestica)
Apples we know today are a far cry from their ancient ancestors. Years of breeding for selection of fruit size, acidity, colour, firmness, and soluble sugar, has led to the creation of more than 7 500 new cultivars that ripen at different times during the season, with skin colours ranging from yellow and green to bright red and pink, as well as blush types. Different cultivars are bred for various tastes and uses, including cooking, eating raw, and cider or apple juice production.
Apples grown from seed tend to be very different from those of their parents, and the resultant fruit frequently lacks desired characteristics. Apple trees grown without rootstocks also tend to be larger and much slower to fruit. Therefore, for commercial purposes, apple cultivars are propagated by clonal grafting onto rootstocks, which are used to control the speed of growth and the size of the resulting tree, allowing for easier harvesting.
The apple is a deciduous tree, and wild trees can reach up to 9m in height with an equal spread, but in cultivation, grafted rootstocks generally stand 2 to 4.5 tall with an equal spread, and exciting new dwarf cultivars are also now available. When apples are cultivated this way, the size, shape and branch density are determined by both rootstock selection and pruning methods.
The simple spring blossoms are white with a tinge of pink that gradually fades, appearing at the same time as the fresh new leaves to create a perfect picture of spring. The flowers are produced in small clusters of 4 to 6 flowers, called a “cyme”. The central flower of the inflorescence is called the "king bloom" as it opens first and can develop a larger fruit.
Popular Apples Cultivars for South African Gardens
It’s essential to get expert advice when selecting your apple trees and your local garden centre will stock the correct varieties for your climatic region, and will also help you to select the best cultivars and pollinators for your specific needs.
Malus domestica 'Golden Delicious'
Golden Delicious has sweet and crisp medium to large-sized apples with a pale green to golden-yellow skin. Its smaller growth habit makes it very suitable for small gardens and large pots. Due to its adaptability to a wide range of climates and various soil types, as well as its long storage life, golden delicious has remained popular with gardeners since the late 19th century. It starts flowering around early October and is ready to harvest from late February to early March. It needs cross pollination, and ‘Granny Smith’ or ‘Early Red One’ are recommended.
Malus domestica ‘Granny Smith’
Granny Smith is an apple cultivar named after Maria Ann Smith, who propagated it in 1868, in Australia. Granny Smith produces apples with bright green skins, and a texture that is crisp and firm, with a juicy, sweet and tart flavour that is perfect for cooking and baking. It flowers in October and ripens in late summer, from February to late March. Granny Smith needs to be cross pollinated with ‘Early Red One’ or ‘Golden Delicious’.
Malus domestica ‘Cripps Pink’
Cripps Pink is also called "Pink Lady", and this attractive modern apple variety comes from Australia, and is the only truly pink apple on the market. This relatively new cultivar is a cross between Golden Delicious and Lady Williams. Besides its reddish-pink skin colour, the flesh is very firm with a snappy tartness and crisp, sweet taste. The flesh resists browning when cut, making for a delicious fresh-eating apple with a long storage life. Pink lady is not self-pollinating, and requires Granny Smith to pollinate it.
 Apple Dwarf 'Fuji' Picture courtesy www.justberryplants.co.zaMalus domestica ‘Royal Beauty’
Royal Beauty is a crisp, red apple with red stripes and tasty, sweet flesh. It flowers from the first week in October and is ready to harvest towards the end of January. Royal Beauty requires a pollinator, and Golden Delicious or Granny Smith work well for this.
Malus domestica ‘Anna’
Anna is self-pollinating and was developed in Israel to suit warmer climates, or low-chill conditions. It is known for its generous crops, producing apples with a light, greenish-yellow skin and a distinctive red blush. The crisp white flesh is sweet with a little tang that is always refreshing. Anna blooms around mid-October and is harvested from February to March.
Malus domestica ‘Early Red One’
The Early Red Apple tree produces large fruits that are really sweet and delicious with deep-red skin and a crispy texture. It flowers around mid-October and is ready to harvest towards the end of February to early March. Granny Smith or Golden Delicious apples are used as pollinators.
Are Dwarf Apple Trees Available in South Africa?
Dwarf fruit trees like apples are becoming increasingly popular in South Africa, and are available at selected garden centres, and online.
The dwarf apple trees mentioned below are available from Linda and Bev at Just Berry Plants. These sisters share a passion for teaching gardeners and communities how to grow their own produce. Whether you have a large garden or an indoor pot, Bev and Linda can guide you through the process of caring for and growing your own berry plants and fruit trees.
Their dwarf apple trees are grafted onto a dwarf M9 rootstock, which is small but very productive, and if cared for correctly the little trees will start bearing fruit only 1 year after planting out. The rootstock allows the tree to grow up to 3m tall, with a width of 1m. Because the rootstock is small the branches may need support, especially when they are fruiting. Although some of these apples are self-fertile, they perform better if planted with a different variety for pollination. They also require winter temperatures below 7°C.
These delightful little apple trees are perfect for even the smallest of gardens, and they can be planted closely together to make an ‘apple tree hedge’. You can even espalier them against a wall or fence, or simply grown them singly in pots.
Click here to visit Just Berry Plants
Members can click here to read my article “How to Grow Fruit Trees in Small Spaces”
Dwarf ‘Granny Smith’ Apple Tree
Dwarf Granny Smith apples are the same as the famous bright green Granny Smith we all know and love, with its crisp and firm flesh with a juicy, sweet, and tarty flavour. It flowers in late September and the fruit ripens in late summer, from February to late March. It needs to be cross pollinated with ‘Early Red One’ or ‘Golden Delicious’.
Dwarf ‘Fuji’ Apple Tree
Dwarf Fuji apples have a lovely red and yellow skin and the texture of the flesh is crispy and firm, with a juicy, deliciously sweet flavour. It flowers in late September and the fruit will ripen during late summer, in February and March. It is essential to have another pollinator, and Granny Smith is recommended.
Dwarf ‘Royal Gala’ Apple Tree
Royal Gala is a red-striped yellow apple with a terrific crunch and reliably pleasant sweet flavour. It became well known in Australia, but it's actually about 90 years old, developed by New Zealander John Kidd in the 1930's as a cross between a ‘Golden Delicious’ and another one of his selections ‘Kidd's Orange Red’. This apple stores well and is suitable for warmer climates with low-chill conditions. It flowers in late September and the fruit ripens in late summer, from February to March. Although this apple is self-fertile, it performs much better if planted with a cross pollinator like Granny Smith.
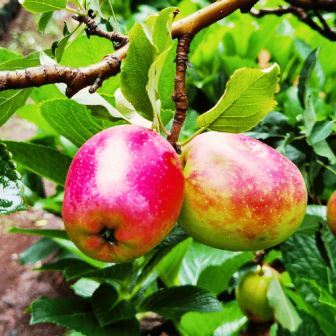 Apple 'Anna' Picture courtesy www.justberryplants.co.zaWhat are the Health Benefits of Apples?
The adage “an apple a day keeps the doctor away” was said to be an old saying from Pembrokeshire in Wales, but it is believed that the original phrase was actually “eat an apple on going to bed, and you’ll keep the doctor from earning his bread”, as first recorded in the 1860’s. In the 19th and early 20th century the rhyming evolved yet again to say “an apple a day, no doctor to pay” and “an apple a day sends the doctor away”.
The concept that apples are one of the healthiest of fruits is very old, and throughout the ages the apple has symbolized health and healthy habits. The fruit is documented in traditional Ayurveda medicine, dating back about 1 500 years in southern Asia, and the ancient Romans and Anglo-Saxons also knew about the healthful properties of apples. Today the apple is still used by governments and private health organizations to symbolize lifestyle choices that lead to health and wellness, for very good reasons.
Nutritional Facts about Apples
A single medium raw apple with its skin on provides about: 95 Calories, 0 grams of Fat, 1 gram Protein, 25 grams Carbohydrates, 19 grams of naturally occurring Sugars, 3 grams of Fibre, and 86% Water.
Apples are relatively high in vitamin C, and one medium apple contains 9% of the recommended daily value of Vitamin C. Vitamin C is an antioxidant that helps the immune system work properly to fight off disease. It also helps improve the absorption of iron from plant foods, and is required for collagen production.
The fruit is high in phytochemicals, including quercetin, catechins, chlorogenic acids, and epicatechin, all of which have strong antioxidant properties.
Are Apples Good for the Teeth?
Although chomping on a raw apple a day won’t turn already bad teeth into shiny white ones, it can do wonders for your teeth and gums because its sweet and tender flesh produces lots of saliva which protects the surface of the teeth and gums, slowing down tooth decay.
Can Apples Help with Heart Health?
Apples are a rich source of fibre, polyphenols, and other nutrients that support heart health. Studies have linked apples to a lower risk of heart disease, and show that eating only one small apple a day, and especially with the skin on, can decrease the risk of heart disease, as well as risk factors such as high cholesterol and high blood pressure.
Can Apples Reduce the Risk of Diabetes?
Research suggests that people who eat two servings of whole fruits like apples per day have a 36% lower risk of type 2 diabetes. The soluble fibre in apples may also protect against diabetes by slowing down the absorption of carbohydrates, preventing blood sugar spikes. The concentration of flavonoids, including quercetin in apples may help lower blood sugar and improve insulin sensitivity.
Since apples contain carbohydrates, people who already have diabetes should try to stick with one small apple, equal to around 15 carbohydrates per meal or snack.
Can Apples Help with Weight Management?
Apples are high in water and fibre, which is linked to weight loss, and because they are low in calories, can support weight management by keeping you feeling full and reducing your daily calorie intake.
Can Apples Help to Improve Digestion?
Because apples are a good source of pectin, a soluble fibre that absorbs water in the digestive tract, and also works as a prebiotic by encouraging the growth and activity of beneficial bacteria in the gut, apples are great at improving digestion.
Can Apples Decrease the Risk of Cancer?
Several observational studies suggest that apples may help decrease the risk of breast cancer, lung cancer, prostate cancer, and certain cancers of the digestive tract. However, more human studies are needed to confirm the anti-cancer effects of apples.
Because apples are rich in antioxidants, they may decrease cancer risk by neutralizing cancer-causing free radicals. In addition, the phytochemicals in apples can help slow down the growth of cancer cells and prevent them from multiplying.
Adding fibre to your diet has been recommended by doctors for a very long time, for good reasons. The fibre found in apples may help protect against colorectal cancer, and recent findings from the American Institute for Cancer Research suggest that for every 10-gram increase in dietary fibre there is a 7% decrease in the risk of colorectal cancer.
Apples also contain flavonol, a known enemy of pancreatic cancers. If you consume apples a few times a day, you can reduce your risk of getting a tumour in your pancreas. There are also the so-called triterpenoids, compounds within the peel. By ingesting them, you reduce the risk of tumour growth. Research suggests that soon apple-based cancer medications will be on the market.
Can Apples Support Brain Health?
Apples do slow down mental aging, and recent studies done on mice have shown some startling data regarding the connection between apples and mental health. The quercetin in apples may help protect neurons in the brain from oxidative damage, and the mice in the studies which consumed apples together with their normal diets showed greater intellectual capacities, and they also had higher levels of acetylcholine, an important neurotransmitter. This can be an important breakthrough when it comes to defeating Alzheimer’s, and studies are ongoing.
Thanks to a few promising studies connecting apples and Parkinson’s, it was shown that the high concentration of antioxidants in apples prevented dopamine-producing cells from breaking down, and this slows down the process that leads to Parkinson’s.
Are There Any Risks Associated With Eating Apples?
Apples are unlikely to cause any serious side effects when consumed in moderation. However, some people experience bloating, gas, and digestive issues after eating apples. This is because apples are high in fibre and contain fructose and sorbitol, which are sugars that some people can't tolerate.
Some people have an apple allergy, and studies have shown that 70% of people with birch pollen allergy develop pollen-related food allergies, especially to apples. This is due to the similarity between apple proteins and birch pollen.
Lastly, while a few apple seeds are unlikely to cause harm, consuming too many can be dangerous. This is because chewed or crushed apple seeds release a highly toxic compound called cyanide.
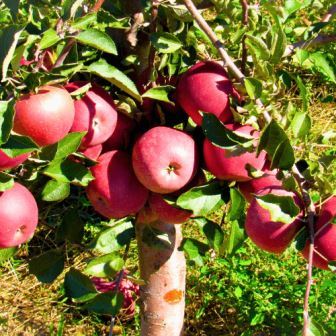 Apple 'Pink Lady' Picture courtesy www.justberryplants.co.zaWays to Use Apples in the Kitchen?
Apples come in various colours and flavours which lend themselves to a variety of dishes. They are healthiest eaten raw with the skin on as a snack, or lightly cooked in baked goods, and certain varieties are more suitable for making ciders, juices, jams, and even wine.
There is a world of apple recipes out there, so go online to find your favourites. Besides the traditional uses of apples, why not try pairing sliced apples with nut butter, or use applesauce instead of butter in baking recipes. Apple slices are also delicious blended into smoothies using coconut milk, almond mild, or your favourite milk substitute, and you can add a variety of your favourite spices like cinnamon or ginger, and we all know how wonderful apples are if simply chopped fresh and added to salads.
How to Use Apple Trees in the Garden?
Today apples trees are cultivated in gardens worldwide because they are the most versatile of fruit trees, and the range of cultivars is such that they will suit most types of soil and climates. The various cultivars will also ripen at different times during the season, so you may be tempted to plant more than just one.
The lovely dark green leaves of apple trees provide welcome shade for the summer garden, whilst allowing the winter sunshine through. And in spring when the blossoms and new leaves appear apple trees are just picture perfect. In summer their fruits will inspire you to use them in the most innovative ways, and if there’s a bumper crop, baskets of freshly harvested apples are always welcomed by family, friends and neighbours.
New dwarf apple trees are compact growers suitable for small gardens. They are charming if grown on espaliers, in a pot, or as a small apple hedge, and if they are surrounded by beautiful flowering companion plants that attract vital pollinators like bees, and also help to deter pests naturally, your tiny garden could be sustainable and quite delightful.
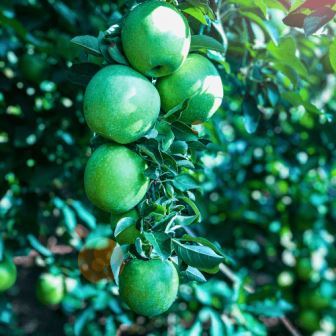 Apple 'Granny Smith' Picture courtesy www.justberryplants.co.zaCompanion Planting with Apple Trees
For centuries gardeners have maximized the space in their gardens by growing fruits, veggies, herbs, and ornamental plants in combinations that benefit each other. These gardens are not only more functional, and especially for smaller gardens, but also much more aesthetically pleasing to the senses. Grouping companion plants together also protects the topsoil and helps to conserve moisture, acting as living mulch, and keeping the weeds down.
Just remember that the landscape and climate play a big factor in deciding which companion plants are right for your apple trees, and it is advisable to plant the companion plants at the same time as your small tree so they can grow up together. Ideally it would be best to plant herbs and perennials like mint, that prefer some shade, closer to the trunks of the trees, and the sun lovers further away where they will still catch the sunlight as the tree grows.
As your apple trees mature the branches will cast more shade over the years, so your garden will also need to evolve, and you may have to relocate some of your sun loving perennials, but this is not a problem as most perennials are easy to relocate. Growing herbs and perennials in pots underneath the trees can be a good solution for very small spaces, but ensure that the pots and the growing medium used are lightweight, so they can easily be moved out of the way to facilitate pruning, spraying and harvesting.
Marigolds
Marigolds are wonderful annuals to include because they have excellent pest control properties, warding off most common garden pests with their smell. They are also used as a ‘bait crop’ for red spider mites as these pests are attracted to marigolds, and will often attack them first. Once infested, you can simply uproot and dispose of the marigolds, and if you collect their seeds regularly, you will always have a constant supply to sow again.
Members can click here to read more about Marigolds
Chrysanthemums
Chrysanthemums are as impressive as marigolds for pest control, and simply planting them every few meters around your apple trees will keep the vast majority of pests away. There are many types of Chrysanthemum, but for planting around apple trees, the charming little white flowering, carpet forming Chrysanthemum paludosum is highly recommended.
Members can click here to read more about Chrysanthemums
Nasturtiums
Nasturtiums are also top of the list when it comes to apples, as they repel coddling moths. They are also typically used as a sacrificial trap plant, because pesky insects like aphids and worms really seem to love these guys and will go directly to them instead of bothering your apple trees. Once infested, the nasturtiums are easily disposed of, and if you collect their seeds, you will always have a constant supply to sow again.
Members can click here to read more about Nasturtiums
Chives
Due to their pungent oniony smell, all members of the onion family (Allium) are well known for being excellent natural pest controls and will help to prevent apple scab. Chives are highly recommended because they are so easy to grow and look stunning in the garden when in full bloom.
Members can click here to read more about Chives
Dill
Dill is a perfect companion plant to grow near apple trees as it attracts tons of beneficial insects, like bees to pollinate, and ladybirds and other predator bugs that feed on common garden pests.
Members can click here to read more about Dill
Fennel
Fennel is a great deterrent to aphids if planted around apple trees, and particularly in spring when young aphids are rampantly devouring fresh green shoots.
Members can click here to read more about Fennel
Mint
Mint wards off moths and other pests due to its menthol aroma. There are many types to choose from, and because it likes some shade is good to plant closer to the trunks of apple trees.
Members can click here to read more about Mint
Dandelion
Dandelions are definitely deserving of their place on this list, as these beautiful ‘weeds’ are not only good and healthy to eat, they help to strengthen the roots of plants, and also release ethylene gas which promotes the fruiting and ripening of fruit. Collect seeds in the wild to cultivate underneath your trees.
Click here to see Google Images of Dandelions
Yarrow
These beautiful perennial flowers attract beneficial insect predators to the garden to feast on a plethora of common garden pests. They also draw in local pollinators like bees to boost your apple tree’s flower and fruit production.
Members can click here to read more about Yarrow
Coriander
This herb is the perfect low-key addition to sunny areas around your apple trees, as it attracts bees and other beneficial insects. Coriander is also great for helping drain an area with poor natural drainage, and improves the nutrient levels in the ground.
Members can click here to read more about Coriander
Rhubarb
Rhubarb is an old-fashioned perennial plant that works wonderfully as a companion plant for apple trees. It not only solves nitrogen issues, but also wards off harmful bugs as well.
Members can click here to read more about Rhubarb
Chamomile
Chamomile is sought after for its antibacterial and antifungal properties, and it helps to protect apple trees and other plants from harmful bacteria, fungi, and diseases like mould and mildew.
Members can click here to read more about Chamomile
Lavender
Lavender is an excellent companion plant for apple trees because it attracts bees and its pungent smell wards off many garden insects, as well as large pests like deer and rabbits. It’s good to use further away from the trees in a sunny spot, and if clipped regularly, makes a lovely low hedge.
Members can click here to read more about Lavender
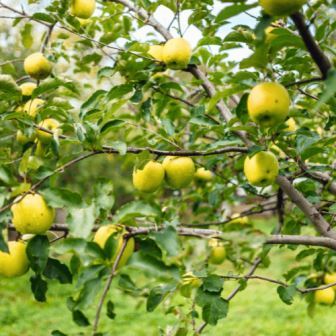 Apple 'Golden Delicious' Picture courtesy www.justberryplants.co.zaHow to Cultivate Apple Trees?
If you’re planning on growing apples in South Africa, you will need to consider the climate and soil conditions of your region, and knowledge of pruning and pest control is also essential.
Which are the Main Apple Growing Regions in South Africa?
In South Africa, commercial apple production occurs primarily in the Western Cape, as its climate is perfect for apple production. Smaller plantings are also grown commercially in the Eastern and Northern Cape, and North West Province. Large areas in Mpumalanga and the Free State are now also devoted to commercial apple growing.
There is a very wide selection of apple varieties available to gardeners today, each with its own specific requirements, and if you select the correct cultivars, apples can be grown in gardens almost anywhere in South Africa. Your local nursery should have the correct cultivars available for your specific climate.
Do Apples Need a Cross Pollinator?
Most apples are self-infertile, which means that they won’t set a good crop with their own pollen but will crop consistently when pollinated by compatible cultivars. However, there are exceptions and some apples are self-fertile. To ensure good pollination and fruit set, choose cultivars that flower at the same time.
How Are Apple Trees Pollinated?
Bees are the main pollinators, and farmers often introduce them into their apple orchards during flowering season. As discussed above, home growers can attract bees by planting companion plants bees love close to the trees.
Which Climate Type and Temperature is Best Suited for Growing Apples?
Although there is a very diverse range of apple trees available for varying climate types, and apples hold the reputation of a robust autumn fruit crop which can grow in nearly any hardiness zone, apples thrive in temperate climates where it's cold in the winter ‘high chilling’, with hot and fairly dry summers with medium to high humidity; rather than an arid, hot and dry climate. If you live in warmer winter regions, select varieties that have ‘low-chilling’ requirements.
Apples are not recommended for areas where temperatures regularly fall near or below freezing or those prone to late frosts which can decimate the blossoms and affect fruit production. And while it is possible to grow apples in warmer climates, they grow best in regions where temperatures rarely rise above 32°C.
Extreme weather swings can alter that crisp, sweet flavour, and your apples could taste different from year to year based on prevailing weather and climatic conditions. For example, warmer than normal spring temperatures can cause an early bloom that may lead to changes in the firmness of the apple, and its acid concentration levels. Too much summer heat and sun can produce sunburnt fruit, altering the colour of the skin and leaving it pink or brown instead of red. A high number of very hot days will also often result in softer fruit that takes on a mushy or mealy texture.
What is Chill Units in Apples?
Apples flower in mid to late-spring, depending on the cultivar, and to flower well they need a long period at low temperatures, and the best flowering conditions are spring temperatures around 4 to 7°C. The time exposed to these particular temperatures is often referred to as “chill units” or “hours”, and refers to the total amount of time a deciduous fruit tree needs to be exposed to effective winter temperatures to help them break dormancy, and flower and set fruit normally.
For most deciduous fruit trees, the number of cold units for a specific region will determine the suitability of a cultivar. For apples, cold units are high, 900 to 1 200 hours or more, and insufficient cold hours will result in delayed foliation, which in turn leads to poor growth and inadequate fruit production.
Extreme cold can lead to a smaller crop, and even though apples might survive a cold snap of more than four hours below freezing, it can damage the crop. In areas subjected to heavy frosts, choose late-flowering or more frost-resistant cultivars.
What are Advection Freezes and Radiation Freezes?
Advection freezes and radiation freezes are two types of events that apple farmers are always on the lookout for.
An advection freeze hits when a dry, cold air mass hits and conditions are windy throughout the night and early morning, radiating away any heat held within the plant and soil surrounding it.
A radiation freeze happens when a layer of cold, dry air forms beneath a layer of warm air on a clear, calm night, and if the tree turns colder than the air, it can suffer damage.
This is why apple farmers pay close attention to local weather forecasts and gauge what times they may need to apply frost protection methods such as covers, wind machines, heaters and water applications.
How Much Sun Do Apple Trees Require?
Apples prefer a sheltered and full sun position in the garden, which means a daily dose of sun that exceeds six hours.
What Soil Type and pH is best for Growing Apples?
Apples grow best on well-drained loam soils having a depth of at least 60cm and a slightly acid to neutral pH range of 5.5 to 7. The soil should not be waterlogged and free from hard substrata like rocks. Soils with heavy clay or compacted subsoil are to be avoided. Apple trees also don’t do well in very sandy or very acidic soils. When planting, to get your trees off to a good start, add plenty of compost to the planting holes.
If you are growing apples in large pots, ensure that you use a good quality potting soil mixed with some compost. Adding vermiculite or a block of palm peat will further enhance the texture of the soil, allowing it to retain water, while at the same time allowing for excellent drainage.
When is the Best Time to Plant Apple Trees?
Apple trees grown in nursery bags can be planted out at any time. In our mild and moist winter rainfall regions apples can be planted out in autumn or in spring, and in the central or northern regions of the country apples are usually planted in spring.
If you have planned on planting companion plants together with your apple trees, as discussed above, you should plant them at this stage so they can grow up together.
How to Plant an Apple Tree?
Growing a fruit tree will require that you dig your hole at least double the diameter of the plant bag and at least 60cm to 1m deep. First cut out the round underside of the plant bag before placing the tree into the hole. Ensure that it is at the correct planting depth and is not planted deeper than it was in its nursery bag. Then slide the plant bag off before adding your soil. When you cover the roots with soil, tamp it down as you go to ensure that the roots are completely touching the dirt.
How to Space Apple Trees?
While you’ll need to take a variety of factors into account, specifically the type and eventual size of the trees you are planting, apple trees are typically spaced with 4.5 to 5.5m between them, and in rows 5.5m wide. Dwarf cultivars are naturally spaced closer together.
How Much Water do Apple Trees Require?
Because it takes about one growing season for a young apple tree to establish its roots, young trees need to be watered regularly, using around 19 litres of water, about 2 to 3 times a week, depending on soil type and climate.
Generally, about 25mm of rainfall every seven to ten days is sufficient for established apple trees, and if rainfall is good, you may only need to water when you experience drought. However, if rainfall is sparse in summer established apple trees should be irrigated deeply at least once a month, when the top eight to ten inches of the soil is dry. And if it is very hot and dry in your location, the trees may need even more frequent watering.
The frequency of watering depends on your soil type, and whether it is sandy or loamy. Sandy soils need a little water which is applied at short intervals, while loamy or slightly clayey soils need watering at longer intervals. Weather conditions also play a vital role, and if it rains a lot you don’t need to water at all, but if it’s really hot in summer, you will naturally need to water more. Although water is essential for good growth it is also most important not to overwater. If you see standing water after irrigating, this is a sure sign of overwatering, which can cause root rot and may deter the tree from absorbing necessary minerals.
Farmers will look at annual rainfall, and as a very general indication, young apple trees need 300 to 400mm of water per year, and this increases to 500 to 700mm per year for mature trees.
Post-harvest irrigation in late summer and autumn is also vital, as next season’s fruit buds are formed during this period. And even though apple trees are dormant, they still need water in winter, but much less frequently. In the summer rainfall regions, soak the roots once or twice a month depending on soil type, and do this during warmer winter days when daytime temperatures are above 4°C.
To water you can use a hosepipe, simply putting it down near the roots on a slow trickle in order to give your tree a deep soak without the water flowing everywhere. Soaker hoses and drip irrigation are perfect for watering fruit trees and their companion plants.
A rainier summer season sometimes brings larger apples, and these apples are best for juicing and cooking. Excess rainfall can also cause apples to grow into a softer texture that is more prone to bruising, and can lead to moulding. A drier season will produce smaller, sweeter apples which are good for snacking on.
How to Feed Apple Trees?
When fruit trees are first planted, the priority is to encourage them to grow roots by planting them in good quality soil with lots of added compost, and watering them regularly to maintain even soil moisture. As long as the soil is good young fruit trees do not need to be fertilised, but if soil quality is not perfect, you can feed with nitrogen fertilisers or other balanced organic fertilisers. This, together with a good layer of mulch around their roots will keep them healthy, and also help to suppress weeds. Never pile mulch up directly on the stems of trees, rather start a couple of centimetres away from the trunk.
One to two years after planting, the young trees should have established their roots and you can start fertilising to promote strong, steady growth. Spring is the best time for fertilising fruit trees, and it is recommended to use slow release organic fertilisers like 3:1:5 for fruit trees, sprinkling it onto the surface of the soil, starting a couple of centimetres away from the trunk and spreading it over the entire root area to just beyond the drip line of the branch canopy. Lastly cover the area with compost or other organic mulch, and water it in well. This method of fertilising, using only organic products, helps the trees form relationships with beneficial soil microbes, forming a symbiotic relationship that benefits both.
For established apple trees fertilise regularly during the season according to the instructions on the product you have chosen to use. More is never better when it comes to fertilising your fruit trees, and it’s better to apply a little bit less fertiliser than the recommended dose, rather than too much.
Should your apple trees struggle despite attentive pruning and feeding, a spray made from liquid kelp is highly recommended, as micronutrient deficiencies are common in fruit trees, and kelp or seaweed sprays contain a buffet of micronutrients, including calcium and zinc, in a form that fruit trees can take up through their leaves as a foliar feed. The best times to apply kelp sprays are late spring, after the new leaves appear, and again in early summer when leaves show their mature green colour.
Healthy fruit trees that are watered and fed correctly to support sturdy new growth will be better able to stand up to insect pest and diseases. Control weeds around the trees which compete for water and fertiliser, and apply organic mulch around the trees annually to keep them vigorous.
How and When to Prune Apple Trees?
Pruning can stunt the growth of young trees and it can interfere with their development, so don’t rush to prune the entire tree, but rather focus on first removing any damaged or dead branches.
Once the tree has reached maturity you can prune it annually in winter. Mature trees are usually pruned to keep them around 4m tall and wide, and even the dwarf cultivars will need some pruning. Pruning is an important aspect of caring for apple trees as it decreases the risk of disease. Most pruning is carried out in winter when the trees are dormant, and because the trees will only bear on wood that grew the previous year, take care to not prune away these new fruit buds.
The open-centre pruning method is best, as it removes any excess branches from the middle of the tree that will prevent light from penetrating into the centre. This will ensure that fruit forms on these central branches, and not only on the outer branches of the tree. You will also need to cut off weak twigs and decrease the length of some stems during this process.
Summer pruning both before and after harvesting to remove excess water shoots is another effective way to improve the penetration of sunlight to the centre of trees. Water shoots are distinctive-looking vertical shoots that grow strongly. They usually sprout in spring, often in large numbers, and especially after a tree has been heavily pruned. Removing excess water shoots will also improve fruit colour and production in general.
Prune on a sunny day to prevent fungal infections from entering the tree through pruning wounds, and to prevent the spreading of diseases between trees, disinfect your pruning equipment after each tree pruned. Large pruning cuts should be sealed with a tree sealer.
Does the Fruit of Apples Trees Need to be Thinned Out?
Some seasons you may need to thin out the fruit by removing any abnormally shaped or damaged apples to ensure that the branches are not too burdened and susceptible to breaking.
Can I Grow Apple Trees From Seeds?
Yes you can, but apples grown from seed tend to be very different from those of their parents, and the resultant fruit often lacks desired characteristics. For these reasons it’s better to plant trees budded onto a clonal rootstock.
How Are Apple Trees Propagated?
Apple trees are best bought from reputable nurseries where all the cultivars are budded onto clonal rootstocks. This determines the ultimate size of the tree and also the time when it will bear fruit. Rootstocks are also selected which have resistance to soil-borne diseases.
What Spraying Programme is best for Apple Trees?
Growing quality deciduous stone fruits in the home garden can be very rewarding, and starts with providing the proper growing conditions, and planting recommended varieties for your region. A rigid pest and disease control program also needs to be maintained throughout the year, as preventative spraying with fungicides and pesticides will go a long way in preventing problems.
A well-rounded home spraying program for stone fruit trees includes dormant-season as well as growing-season sprays for pests and diseases at all these stages of growth:
Dormant: Late autumn to early spring
Bud break: Buds begin to swell.
Bud swell: Buds are noticeably swollen, but no green tissue is present.
Pink: Just before the flower buds open.
Bloom: Flowers open.
Petal fall: Last petals are falling.
Shuck-split: Most of the developing fruits have split away from the remains of the dried flower.
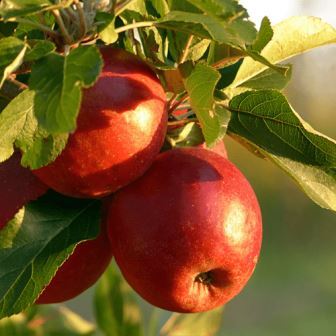 Apple 'Early Red' Picture courtesy www.justberryplants.co.zaProblems, Pests and Diseases of Apple Trees
What is that greyish-white powdery growth on the leaves of my apple tree?
Powdery Mildew is a disease which initially appears as greyish-white blotches on the leaves and stems of the host plant, although it can also be present on fruits and flowers. As it takes hold it gradually spreads to form a powdery blanket-like coating, hence its common name. Powdery mildew can be particularly serious on woody plants like grapevines and fruit trees, where it attacks new growth, causing it to become dwarfed and distorted. Infected fruits develop web-like scars, and a rough, corky spot on the skin.
Powdery mildew is an umbrella term used to describe several types of fungus, the majority of which are host-specific. This means that they attack only one type of plant, for example, the powdery mildew on butternuts will not spread to apples. However, all forms of powdery mildew favour the same type of conditions and look very much alike.
The fungus produces microscopic spores that are spread in the air, or are transported by insects. Because the spores of powdery mildew have higher water content than those of most other fungi, they are able to survive and infect plants under much drier conditions than would normally be the case. It thrives in dry, shady areas where there is little air movement, and has a preferred temperature range of 15°C to 26°C. In winter it goes dormant, overwintering on living plants, or amongst plant matter, and as the weather warms up in spring it starts asexual production of new spores for dispersal.
The fungus enters the cells on the leaf surface where it taps into the plant’s food store. In small infections, powdery mildew will have little effect on the plant, and although unsightly, is rarely fatal. As it begins to spread, however, and more of the leaf’s surface is covered, it can seriously inhibit the leaf’s ability to photosynthesise. This weakens and reduces plant growth, causing the leaves to turn yellow and it can also deform fruits and buds.
Click here to see Google Images of Powdery Mildew on Apple Trees
How to Prevent Powdery Mildew?
Reduce the amount of dead plant matter lying around the trees as these could harbour powdery mildew spores; and keep the plants well-watered, as this reduces water stress and their susceptibility to infection. Improve circulation around the trees by thinning or pruning.
Which Fungicides are used to Treat Powdery Mildew?
When conditions favour this disease, the best way to control powdery mildew is through preventative spraying. Margaret Roberts Organic Fungicide will control most fungal diseases and is very effective for powdery mildew. Neem oil is also very effective, as is Efekto Kumulus.
What is causing warty lesions on the fruit of my apples?
Scab, also known as “Verrucosis” is a fungal disease that affects both apples and pears, causing raised roughened warty lesions to form on the outside of the fruit. While the inside of the fruit remains unaffected, the disease gradually reduces the vigour of the tree. Cool and damp weather conditions encourage the spread of disease spores, and trees suffering from water stress are also more susceptible to scab.
Click here to see Google Images of Apple Scab
How to Prevent Apple Scab?
Watering regularly and deeply during hot and dry summer spells will help apples and pears resist this disease; and a preventative approach to controlling fungal diseases by spraying regularly with an appropriate fungicide, will go a long way in preventing problems in the first place.
Which Fungicides are used to Treat Apple Scab?
To control this fungal disease, spray your fruit trees with Efekto Virikop or Efekto Kumulus WG.
What’s causing a brown, spreading rot in the fruit of my apple tree?
Brown rot is a fungal disease which can already be active at flowering time, causing both the blossoms and the leaves on fruiting spurs to turn brown and shrivel. Severity varies greatly from year to year, depending on weather conditions at flowering. It affects apples, pears and other deciduous stone fruits, including peaches, nectarines, plums, cherries, apricots; and even citrus trees.
From mid-summer onwards, and usually under wet conditions, it shows as a brown, spreading rot in the fruit, and often the light brown pustules of spores are visible. Brown rot can spread to cover the stems, flowers and the fruit, and as it gets worse, it eventually mummifies the fruit, and you will clearly see the fuzzy tan or grey spores.
Click here to see Google Images of Brown Rot on Apples
How to Help Prevent Brown Rot?
Brown rot spreads from wounds in the fruit, and especially those made by birds, codling moths, and apple scab infection. Bird netting will protect the fruit from damage, and preventative spraying against coddling moths and scab will also help in preventing the spread of this disease. If practical, prune out and dispose of infected spurs and blossoms to reduce the amount of fungus available to infect fruit. Minimise carry-over of the pathogens by removing and disposing of all brown rotted fruit promptly, disposing of it by burying it at least 30cm deep under the soil, or bagging and disposing of it safely.
Which Fungicides Treat Brown Rot?
Any copper based fungicides will help prevent and control brown rot. Start spraying 2 to 3 weeks prior to harvesting, as the fruit is ripening.
What is stinging my apples and causing them to rot?
Small ‘stings’ on the fruit can be caused by one or two pests, or even both: Coddling Moths and Fruit Flies.
Coddling Moth (Cydia pomonella)
The most important cause of damage and fruit loss in apples are codling and false codling moths. If you notice small pinpricks or pitted spots on the surface of your apples, this indicates the presence of coddling moths, which lay their eggs on the leaves of apple trees. Once hatched, the immature larvae bore into the skin and start feeding on the flesh, and as they mature they cause brown or rotten trails running to the core of the fruit.
The Coddling Moth is thought to be native to Central Asia, but today, except for Japan and Western Australia, it is found on all continents wherever apples and pears are grown. The preferred host plants are pome fruits, especially apple, pear and quince. Other cultivated host plants are crab apple, apricot, peach, plum, prune, cherry, and walnut. Infestation of these fruits often takes place when in close proximity to primary host plants.
Since the coddling moth was first reported in South Africa in 1885, it has remained a major pest of apples and pears and, to a lesser extent, of apricots. If uncontrolled it has the potential to destroy the entire crop.
Click here to see Google Images of Cydia pomonella
What is the Lifecycle of Codling Moths (Cydia pomonella) on Apple Trees?
Cydia pomonella adult moths have a wingspan of about 15 to 22mm. Their forewings are grey to dark brown and bear a copper-coloured circular marking near the tip of the forewing, and the hindwings are brown. Adult females emit a pheromone which serves to attract male mates, and the males can sense this pheromone from over 1 000m away, using a specialized gland on the hindwing. For this reason, the use of pheromone traps for monitoring the incidence of codling moth and fruit fly is imperative.
In early spring the female moths lay their eggs singly on the twigs, leaves, and later in the season even directly on the fruit. Under ideal conditions a single female moth can produce up to 800 eggs. When first laid the tiny eggs have a cream to white colour which changes to a reddish as they develop. Once the larvae hatch they are only 2 to 3mm long with a creamy-white body and a black head capsule, but once mature they are 14 to 20mm long with an orange-pink colour. The young larvae bite their way into the fruit, but strangely, they reject the first few mouthfuls, and this ensures the safe entry and survival of at least some of the larvae, even when the fruit has been sprayed with a stomach poison. As the larvae grow and continue to burrow deeper into the fruit, they leave tunnels full of their excrement, and a discoloration on the skin at the wound site.
Fully grown larvae leave the fruit and crawl along the branches to find a sheltered place to settle down and spin a thick, silken cocoon, to pupate. Emergence of the adult moth from the pupa usually takes place within two weeks of the larva leaving the fruit, and several generations of coddling moths are produced each summer.
During autumn, the larva does not change into a pupa as it does in spring or summer, but instead goes into what is referred to as “diapause”, a dormant winter state of delayed biological development. Diapause allows the insect to synchronize its seasonal activity with the presence of developing fruits on its host trees, and is generally induced by shortening day-length and a fall in temperature.
When temperatures increase in spring the emergence of adult moths coincides with blossom and fruit set of the host plant. Moths are most active prior to and just after sunset, when most of them mate. The adults live from 11 to 22 days, and the total developmental time from egg to adult of non-diapause individuals is from 40 to 65 days. There are three larval generations per year in South Africa, but a partial fourth generation can occur.
The False Codling Moth (Thaumatotibia leucotreta)
The false coddling moth is native to, and a key pest in many countries in sub-Saharan Africa, and in the wild it has a wide range of indigenous host trees such as Wild Figs, Wild Olives, Yellowwoods, the Kei Apple and Red Milkwood. It is a pest of many cultivated crops like apples, and in equatorial Africa it is a major pest of cotton. Over 70 possible exotic host plants are recorded which include a wide variety of crops like: citrus, avocado, coffee, mango, pineapple, litchi, macadamia and pecan nuts, peppers, olives and maize. Deciduous fruits known to be readily infested by false codling moth are apple, apricot, peach, plum, pear, grape, pomegranate and persimmon.
Click here to see Google Images of Thaumatotibia leucotreta
How to Control the Spread of Coddling Moths?
Codling moths are formidable adversaries because most chemical pesticides are only effective against the eggs and the newly hatched larvae, and once they have burrowed into the developing fruit codling moth larvae cannot be controlled, and apples that show obvious wounds or oozing holes should be picked, chopped and composted to interrupt the life cycle of this pest. Collecting and disposing of leaf litter from around trees in the autumn will expose any codling moth larvae on the ground to insectivorous birds and other predators.
How to Trap Coddling Moths?
Pheromone traps and sticky liners are essential to attract and contain adult male codling moths when they emerge. They are available for gardeners and can be found online from South African Suppliers.
Pheromone traps are effective for 4 to 5 weeks from placement. Place the trap in the top 1/3 of your fruit tree. This lure needs to be placed in the shade on the southern side of the tree. Check the trap, and clear out any trapped insects every 7 days.
How to Make DIY Codling Moth Traps?
You can also use homemade traps that catch both male and female moths. Fill a plastic one litre milk jug with 1 cup vinegar, 1/2 cup molasses, 1/8 teaspoon ammonia, and about 5 cups of water. Cut a 5cm hole in the jug, just below its shoulder. Hang up to 3 traps per tree, depending on the size of the tree. Remove trapped insects regularly and replace with fresh bait as required.
Does Preventative Spraying Help for Coddling Moths?
Spraying the trees as a preventative measure will go a long way in controlling these pests. The first spray should be done after 80% of the blossoms have fallen, and every 14 days thereafter. Insecticides are always applied after most of the petals of the blossoms have fallen, and never when the trees are in full bloom, because of the high risk of harming pollinators like bees.
Which are the Best Preventative Sprays for Controlling Coddling Moth Eggs and Larvae?
Bioneem is a great preventative bio-pesticide, from plant origin, for the control of various insects. In addition to deterring feeding insects, neem functions to suppress moulting of certain insects, including Codling Moth and Plum Curculio, disrupting the normal metabolic activity of insects. It is also used to control Aphids, Bollworm, Fruit Fly, Snout Beetle and Spider Mites on deciduous fruit trees, ornamentals and vegetables.
EcoBuz Pest Pro is another great preventative, fungal bio-insecticide that attacks various insect pests like: False Codling Moths, Whitefly, Red Spider Mites, Fall Army Worm, and the Tomato leaf Miner. Each gram contains billions of beneficial fungi spores of Beauvaria bassiana, a common soil borne fungi that occurs naturally in many soils. The strain used in Pest Pro was isolated from the soil beneath a rooibos plant in Clanwilliam, and is therefore well adapted to our hot and dry conditions. To ensure the best germination rates for these fungal spores they are encapsulated in tiny oil droplets to create an environment called a “Colony Forming Unit” (CFU), and once germinated they attack and destroy many common garden pests. Pest Pro is safe, non-toxic and friendly to beneficial insects including bees, ladybirds, parasitic wasps, lacewings, earthworms, birds and fish. Pest Pro is also OMRI certified (Organic).
What is causing pitted dimples on my apples and causing them to rot?
Fruit flies look like a small housefly with clear wings that have orange and brown patterns. When they rest on fruit their wings are usually horizontal. In South Africa the most common species are the Mediterranean and Natal Fruit fly. They emerge in early summer and the female lays her eggs in the fruit, leaving a tiny spot or dimple on the surface, which later forms a pitted dimple. Once hatched the larvae immediately start feeding, creating tunnels throughout the fruit (unlike codling moth which feeds primarily in the core of the fruit), causing dark, sunken pits on the fruit as rot sets in.
Click here to see Google Images of Fruit Fly Damage on Apples
Which are the Best Preventative Measures for Controlling Fruit Flies?
Because fruit flies emerge in spring and early summer, you need to start spraying every two weeks through spring, starting at bud break and continuing until petal fall. Putting out fruit fly bait stations and pheromone traps are also essential to control fruit flies.
Which Products are used for Controlling Fruit Flies?
Eco Fruit Fly Bait GF-120 is an environmentally friendly product by Efekto which is excellent for baiting stations. It consists of a plant protein and sugar formulation with Spinosad as the active ingredient. Spinosad is derived from a soil organism, making GF-120 one of the safest pesticide products available.
Various other natural sprays are available for fruit fly: Biogrow Bioneem has as its active ingredient, Azadirachtin from neem seeds, and it is used to control a wide range of insects (up to 200 insect types) including white flies, leafminers, mealybug, thrips, fruit flies, leaf hopper, red spider mite, weevils and many more. It is relatively harmless to insects that pollinate crops and trees, such as butterflies, spiders and bees, as well as ladybirds that consume aphids. This is because neem products must be ingested to be effective. Thus, insects that feed on plant tissue succumb, while those that feed on nectar or other insects rarely contact significant concentrations of neem products.
How to Make a DIY Fruit Fly Trap?
You may prefer to make your own fruit fly baiting station, and there are many recipes online, but a very simple trap can be made by pouring apple cider vinegar in a bowl and covering it with cling film and piercing several small holes through the cling film to allow the smell to escape, and the fruit flies to enter. Fruit flies don’t seem to be able to resist the aroma of apple cider vinegar, and they get trapped in the bowl and can’t find their way out. Change the vinegar regularly to keep its efficacy and watch the fruit flies flock to it.
What is that mass of white woolly wax on the bark of my apple tree?
Woolly aphids produce masses of white woolly wax on spurs or branches that have been pruned as well as within cracks in the bark of trees. These pests suck on the plants, from the roots to the leaves and twigs, causing curled and twisted leaves as well as yellowing of the foliage, and if left untreated will result in a reduction of the plant’s vigour. Their feeding also causes the formation of galls which destroys developing buds and damages the wood. The galls can split to allow cankers and other diseases to develop within the tree. Under-ground feeding also causes galls, which adversely affects the translocation of water and nutrients.
Woolly aphids are found in temperate regions of the world, and in South Africa this aphid propagates entirely parthenogenetically, a form of asexual reproduction whereby offspring are produced without the embryo being fertilised by a male. Because the females do not need males, a single aphid can start a whole new colony.
During the winter months woolly apple aphids live and feed on the roots of plants, and in spring and summer an endless migration of crawlers emerge from their colonies on the roots and crawl up the tree to start new colonies in the aerial parts of the plant. Under mild climates woolly aphids are also able to overwinter in protected sites on the tree.
Click here to see Google Images of Woolly Aphids on Apple Trees
How to Control and Treat Woolly Aphids on Apple Trees?
The control of subterranean colonies of woolly aphids is very important, and can be the most important step to minimise aerial infestation, and delay their spread.
Which are the Best Products and Sprays for Controlling Woolly Aphids?
Applying sticky bands around the trunks of the trees goes a long way in preventing aerial infestations, as you may be surprised at how many crawlers you find on your traps. Sticky traps also prevent ants from crawling up the trees, as ants are known for their ability to form symbiotic relationships with aphids in exchange for the honeydew they produce, and ants will protect the aphids from their natural predators. Often you will also notice a black sooty mould growing on the sticky surfaces of the leaves. This mutually beneficial relationship between ants and aphids can make it even more difficult to control a woolly aphid infestation.
Ladybirds, lacewings, hoverflies, and parasitic wasps are all beneficial insects that can help control aphids, and earwigs are also known to predate on woolly apple aphids. For this reason organic farmers often purchase these beneficial insects and release them into their orchards.
Check your trees often and for small outbreaks you can either squash them or remove the developing colony with a stiff paint brush. A high-pressure spray from the garden hose can also help remove aphids from the trees.
Which Insecticides are best for controlling Woolly Apple Aphids?
If you suspect woolly aphids in the soil, you can drench the soil with systemic products like Koinor, which also treats mealybugs, another pest of apples.
Regular spraying with contact insecticides is also needed for control and insecticidal soaps and oils are the best choices. Oils may include petroleum-based horticultural oils or plant-derived oils such as Neem or Canola oil. Thorough coverage of infested foliage is required, so apply with a pressure sprayer, and target the underside of the leaves as well as the top. Because soaps and horticultural oils only kill aphids present on the day they are sprayed, applications may need to be repeated.
Although these materials can kill some natural enemies that are present on the plant and are directly hit by the spray, they leave no toxic residue, so they won’t kill natural predators that migrate in after the spray. Never apply soaps or oils on water-stressed plants or when the temperature exceeds 32°C.
If they are applied in winter after pruning, and again, just as the eggs are beginning to hatch in early spring, Horticultural Oils will kill overwintering eggs of aphids on fruit trees. These types of oils also control many other apple pests like red spider and two-spotted mites.
What is that white waxy mass on my apple tree?
Mealybugs may be confused for woolly aphids and cottony cushion scale in appearance, and a heavy infestation manifests as a white waxy mass on the stems, fruits, and the undersides of the leaves, usually along the veins. There are several species of Mealybugs, and more than 120 species have been identified in South Africa alone. Mealybugs are related to scale insects, but unlike their close relatives, mealybugs retain their legs throughout their life. Male mealybugs are 3mm to 4mm in length with a single pair of wings. They lack mouthparts and are short-lived, spending their time flying around searching for females. The females are 4 to 5mm long, with soft, segmented bodies covered in waxy secretions.
Click here to see Google Images of Mealybugs on Apple Trees
Why are the leaves of my apple tree curling, turning yellow and dropping off?
Mealybugs suck sap from young leaves, growth points, fruit, and also the root system, and apples are susceptible to attack during summer when they are actively growing, flowering and fruiting. A severe outbreak can lead to yellowing of the leaves, which eventually fall off, as do the inflorescences and young fruit. If not treated, fruit yield may be greatly reduced.
Why is the fruit on my apple tree discoloured, with lumps, and falling off?
Later in the season mealybugs feed on the fruit and can severely reduce its market value.
Fruit drop, fruit deformation and development of discoloured welts on the rind of the fruit are all indications of mealybug infestation.
Why is there a black sooty mould growing on my apple trees?
Black sooty mould is a by-product of sap sucking by insects like mealybugs and aphids which produce sticky honeydew that encourages the growth of the mould. This sticks to the plant and can inhibit photosynthesis. As with aphids, the honeydew is harvested by ants who also protect the mealybugs from predators. If the mealybugs and their ant friends are controlled, the mould will disappear.
Click here to see Google Images of Black Sooty Mould
Members can click here to read more about mealybugs
Which Sprays Work Best for Mealybugs?
Mealybugs are treated in the same way as scale insects, and you can typically control small populations by removing any badly infested plant material, and then washing the rest of the insects off using a strong jet of water, or you can rub the colonies off the leaves with a soft brush or cloth before washing with water. Mealybugs knocked to the floor will fall victim to ground predators.
Insecticidal soaps work well for mealybugs and many other insect pests, and they work fast, even on heavy infestations. Insecticidal soaps are short-lived natural pesticides which work by damaging the outer layer of soft-bodied insect pests, causing dehydration and death within hours.
Spraying with Neem oil disrupts the growth and development of pest insects and has repellent and anti-feedant properties. Best of all, it’s non-toxic to honey bees and many other beneficial insects. Canola Oil, and Natural Pyrethrins will also kill insects on contact.
Biogrow Neudosan; Biogrow Bioneem; Biogrow Pyrol; Margaret Roberts Organic Insecticide; and Oleum, all work well for both mealybugs and scale insects. And, if you suspect mealybugs in the soil, you can drench the soil with systemic products like Koinor.
Natural predators include ladybird beetles and their larvae, lacewing larvae, hoverfly larvae and several species of parasitic wasps. However, the effectiveness of natural predators will be limited if ants are present, as they will protect the mealybug.
Members can click here to find a Detailed Spraying Programme for Deciduous Stone Fruits
